
Duramax intercooler install has begun
 06-03-2006, 08:32 PM
#1

Okay, i got off of work today around 2pm and i couldn't stand it, i had to get my hands dirty and see what i was going to be in for. I started off by taking a few more measurements before i starting ripping stuff off, everything seemed fine.
First i started by taking out the battery, the radiator cover, upper fan shroud, Allison TCM, and fan blade. Then I laid them all out on the table......

Here is what it looked like in the truck.....

Next, i removed the bottom of the fan shroud, removed the lower radiator hose, removed the upper radiator hose, then removed the tranmission cooler and oil cooler lines. There is no tool neeeded to remove the lines....just remove the dust cover, pull the retainer clip out, rotate the lines a little bit and pull.. They come right out. Here is what it looked like.........

Now we are getting closer. I took another measurement and found that there was no way the intercooler would fit...
...unless i removed the PCM, and battery tray.. . Once i did that i slid the intercooler in to adjust for fitting. It sat down in there pretty well, except for the A/C condensor lines on the passenger side were in the way just a hair. The fitting was real tight against the intercooler and the airbox pedistal. I could have made it fit, but i didnt like the idea of having an A/C line rupture on me so i got out the hole saw. I cut a 2" hole in the corner of the pedistal, enough to let the fitting recess into it a bit and clear the side of the intercooler. Then i used some 1/4" vacuum line (split in half) with some rtv sealant and made a nice rubber stop around the newly cut metal. I positioned the A/C line (had to bend it a little) so it was in the middle of the recess area, but i felt that i needed the rubber there in case something shifted. Hard to tell in this pic, but here is a close up of what that looked like.............

Now, i was ready to fit the intercooler back in again and tighten her up. Got up on my 5 gallon bucket and slowly dropped it into place. Everything looked real well, and all the mounting holes lined up nice. After i got it tightened up in place, this is how it looked.............


Now i was starting to feel good, it was getting late but i decided i had to see if the Dmax radiator was going to fit in there too. So i unboxed it and got my bolts together. I had to push the hoses and cooler lines back to get enough clearance. I dropped it in and "bam!", everything lined right up like it belonged there. Here is what it looked like........

It was pretty close to the waterpump pulley so i threw the fan on to make sure it would clear. It did, with about 2" to spare, here is what it looked like......


So thats about it for tonight. There are going to be a few issues i need to work out. The Dmax radiator does not have the "quick connect" fitting on it like mine did, plus its closer to the engine now so im going to have to cut the hose a little and use a 2.5" to 2" furnco coupling in order to make the bottom radiator hose fit. The top hose will work out fine. The passenger side "charged air return pipe" is going to be a little tricky manuvering around the lower radiator hose, but i think i can make it work. The last issue is going to be relocating my PCM and TCM. The Dmax fan shroud fit fine over the new radiator, however the TCM and cover will not because the blower is in the way. So i am going to remove the whipple....just kidding, but i do need to find a new home for the PCM and TCM. Then hook up the external oil cooler, but that should not be an issue.
So there you have it, im about 50% done, tommorow will most likely be slow because its going to be a bunch of custom fitting stuff to make fit. I will keep this thread updated as I go.
First i started by taking out the battery, the radiator cover, upper fan shroud, Allison TCM, and fan blade. Then I laid them all out on the table......
Here is what it looked like in the truck.....
Next, i removed the bottom of the fan shroud, removed the lower radiator hose, removed the upper radiator hose, then removed the tranmission cooler and oil cooler lines. There is no tool neeeded to remove the lines....just remove the dust cover, pull the retainer clip out, rotate the lines a little bit and pull.. They come right out. Here is what it looked like.........
Now we are getting closer. I took another measurement and found that there was no way the intercooler would fit...
...unless i removed the PCM, and battery tray..
. Once i did that i slid the intercooler in to adjust for fitting. It sat down in there pretty well, except for the A/C condensor lines on the passenger side were in the way just a hair. The fitting was real tight against the intercooler and the airbox pedistal. I could have made it fit, but i didnt like the idea of having an A/C line rupture on me so i got out the hole saw. I cut a 2" hole in the corner of the pedistal, enough to let the fitting recess into it a bit and clear the side of the intercooler. Then i used some 1/4" vacuum line (split in half) with some rtv sealant and made a nice rubber stop around the newly cut metal. I positioned the A/C line (had to bend it a little) so it was in the middle of the recess area, but i felt that i needed the rubber there in case something shifted. Hard to tell in this pic, but here is a close up of what that looked like............. Now, i was ready to fit the intercooler back in again and tighten her up. Got up on my 5 gallon bucket and slowly dropped it into place. Everything looked real well, and all the mounting holes lined up nice. After i got it tightened up in place, this is how it looked.............
Now i was starting to feel good, it was getting late but i decided i had to see if the Dmax radiator was going to fit in there too. So i unboxed it and got my bolts together. I had to push the hoses and cooler lines back to get enough clearance. I dropped it in and "bam!", everything lined right up like it belonged there. Here is what it looked like........
It was pretty close to the waterpump pulley so i threw the fan on to make sure it would clear. It did, with about 2" to spare, here is what it looked like......
So thats about it for tonight. There are going to be a few issues i need to work out. The Dmax radiator does not have the "quick connect" fitting on it like mine did, plus its closer to the engine now so im going to have to cut the hose a little and use a 2.5" to 2" furnco coupling in order to make the bottom radiator hose fit. The top hose will work out fine. The passenger side "charged air return pipe" is going to be a little tricky manuvering around the lower radiator hose, but i think i can make it work. The last issue is going to be relocating my PCM and TCM. The Dmax fan shroud fit fine over the new radiator, however the TCM and cover will not because the blower is in the way. So i am going to remove the whipple....just kidding, but i do need to find a new home for the PCM and TCM. Then hook up the external oil cooler, but that should not be an issue.
So there you have it, im about 50% done, tommorow will most likely be slow because its going to be a bunch of custom fitting stuff to make fit. I will keep this thread updated as I go.
Last edited by Linda; 06-07-2006 at 02:25 PM.

 I take back what i said about you being a plug and play kind of guy. Well, actually, this looks to be pretty much plug and play... so far.

 06-04-2006, 09:14 AM
#6
TECH Regular
iTrader: (3)

Join Date: Jan 2005
Location: Magnolia, Texas
Posts: 456
Likes: 0
Received 0 Likes
on
0 Posts
Linda, Haulin' 8.1 (@GM-Trucks.com) here. You know I've been working on this same prodject, although slower than you LOL. I saw your post here and have been following closely. Looks like I can offer some more advice now.
Here's what I did to relocate the PCM and TCM. I moved the battery over to the pass side rear corner of the engine bay using the factory AUX battery tray ($35 from GM). I bought a 36" positive cable from NAPA and routed it down to the starter. I removed the factory ground cable from the drivers side of the engine and reattached it to the rear of the pass side head, it fit from there under the cowl edge to the battery great. For the factory POS cable I cut a little off and installed an eyelet so that it now bolts onto the underhood electrical center feed. A roll of heat barrier tape was used to provide protection where necessary. Looks sanitary as stock and works perfectly. It's been like so for about 6 months without issue. I spent about $70 altogether reusing factory clamps and such but your results may vary.
Now I should be able to just fold the control modules over still attached to the harnesses onto the original battery tray or into the same space. Simple.
I'll try to post pics right away.
Vernon
06-04-2006, 09:25 AM
#7
Originally Posted by Manic Mechanic
Linda, Haulin' 8.1 (@GM-Trucks.com) here. You know I've been working on this same prodject, although slower than you LOL. I saw your post here and have been following closely. Looks like I can offer some more advice now.
Here's what I did to relocate the PCM and TCM. I moved the battery over to the pass side rear corner of the engine bay using the factory AUX battery tray ($35 from GM). I bought a 36" positive cable from NAPA and routed it down to the starter. I removed the factory ground cable from the drivers side of the engine and reattached it to the rear of the pass side head, it fit from there under the cowl edge to the battery great. For the factory POS cable I cut a little off and installed an eyelet so that it now bolts onto the underhood electrical center feed. A roll of heat barrier tape was used to provide protection where necessary. Looks sanitary as stock and works perfectly. It's been like so for about 6 months without issue. I spent about $70 altogether reusing factory clamps and such but your results may vary.
Now I should be able to just fold the control modules over still attached to the harnesses onto the original battery tray or into the same space. Simple.
I'll try to post pics right away.
Vernon
Here's what I did to relocate the PCM and TCM. I moved the battery over to the pass side rear corner of the engine bay using the factory AUX battery tray ($35 from GM). I bought a 36" positive cable from NAPA and routed it down to the starter. I removed the factory ground cable from the drivers side of the engine and reattached it to the rear of the pass side head, it fit from there under the cowl edge to the battery great. For the factory POS cable I cut a little off and installed an eyelet so that it now bolts onto the underhood electrical center feed. A roll of heat barrier tape was used to provide protection where necessary. Looks sanitary as stock and works perfectly. It's been like so for about 6 months without issue. I spent about $70 altogether reusing factory clamps and such but your results may vary.
Now I should be able to just fold the control modules over still attached to the harnesses onto the original battery tray or into the same space. Simple.
I'll try to post pics right away.
Vernon
For the factory POS cable I cut a little off and installed an eyelet so that it now bolts onto the underhood electrical center feed.
Thanks.
Trending Topics
 06-04-2006, 09:43 AM
#9
TECH Regular
iTrader: (3)
Join Date: Jan 2005
Location: Magnolia, Texas
Posts: 456
Likes: 0
Received 0 Likes
on
0 Posts
Linda, I've just spent 20 minutes digging through my kids junk looking for MY camera patch cable. Three teen-agers, nuff said. I'll be glad to explain as much as possible and post pics soon as my kids are not home today.
I don't have the part# here it seems, probably at work. But any counterman should have little trouble finding it as all HD's with dual batterys have it. Mine came with it also but the Delco batterys failed as usual so mine was rusted out. I replaced it with a fresh one and only run one battery now. The factory AUX battery cables are just for supplying extra current under high demand and not big enough for the starter so I pitched them during the swap.
The big fuse box just behind the battery is also the point of voltage supply for the electrical system. Remove the lid and then remove the outer "box" or cover, it slides up and off the fuse panel.
Notice how the factory battery cable ties into the junction block now with a dual cable set-up. What I did is use the factory cable that comes from the BAT+ junction box (under your Whipple now) to the old battery + to connect onto the junction block of the fuse block only. Since there's no battery over there I just simpyfied the wiring.
Before you had a pos cable from the battery to the fuse box, and from the battery to the starter. Now I have a cable from the battery to the starter. And the old existing cable going from the starter to the fuse box to supply it with battery voltage.
Does this help?
06-04-2006, 10:10 AM
#10
TECH Regular
iTrader: (3)
Join Date: Jan 2005
Location: Magnolia, Texas
Posts: 456
Likes: 0
Received 0 Likes
on
0 Posts
I borrowed one of 4.8T's pics. Hopefully he doesn't mind.
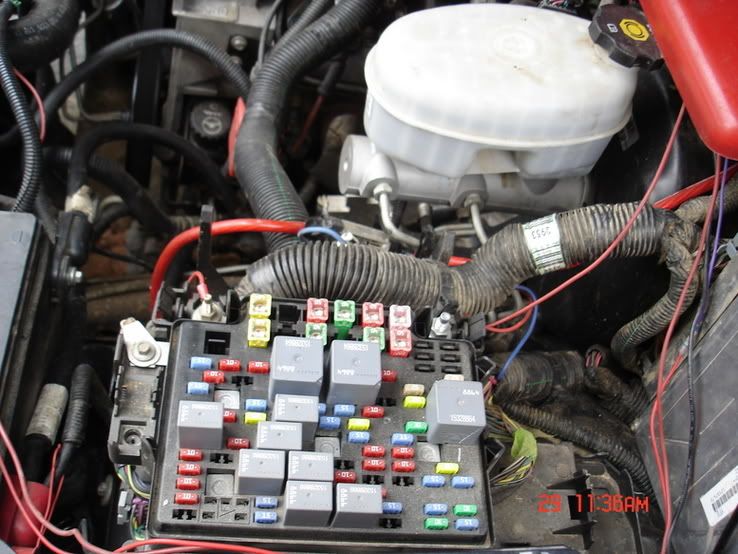
Note the silver eyelet on the front side of the box. This cable piggybacks onto the battery cable at the battery POS terminal (note it's double thick). I took that off and cut the battery cable right about where that white tape is in the pic about 2 inches from the + termials. Then I installed another eyelet from NAPA onto the cut cable and attached it to the box where the old piggyback terminal was. The same cable is coming from the starter through the junction box behind the alternator but now goes directly into the fuse box on the fenderwell without any battery ends. When I say junction box behind the alternator or under your Whipple I mean that little red plastic junction box you can open by hand where the cable is spliced to the alternator.
Note the silver eyelet on the front side of the box. This cable piggybacks onto the battery cable at the battery POS terminal (note it's double thick). I took that off and cut the battery cable right about where that white tape is in the pic about 2 inches from the + termials. Then I installed another eyelet from NAPA onto the cut cable and attached it to the box where the old piggyback terminal was. The same cable is coming from the starter through the junction box behind the alternator but now goes directly into the fuse box on the fenderwell without any battery ends. When I say junction box behind the alternator or under your Whipple I mean that little red plastic junction box you can open by hand where the cable is spliced to the alternator.