
Need to pin one more crank

 12-28-2007, 12:33 PM
#22

Thanks DrX. That takes the pressure off of me to figger how to post pics! The jig fits in place of the washer that is under the bolt that holds the pulley in place. It has two holes that locate the holes that you drill between the crank snout and the crank pulley. Half (180 degrees) of each hole is on the outside of the crank snout and the other half of each hole is on the inside of the pulley. The pins do the same thing a woodruff key would do to secure the pulley to the crank. Real simple job to do with the kit.
12-28-2007, 04:31 PM
#23
Staging Lane

Join Date: Feb 2007
Posts: 77
Likes: 0
Received 0 Likes
on
0 Posts
If I had the pulley in front of me then I would machine you a jig to locate and drill the holes. However, it is not impossible to do by hand. I have never done this particular job before, but many similar. On the dowel pins, find a machining supply store near you and they should have dowel pins, which are hardened and ground. They should also have the reamer size you will need. But be careful as to keeping the drill straight if you decide to ream the holes so you don't break the reamer. A HSS (high speed steel) reamer should work fine and not be as brittle as a carbide or carbide tipped reamer so it should be more "forgiving". Also, if doing it by hand it wouldn't hurt to use a center drill to help locate the holes then use a smaller drill as a pilot. I hope this helps!!
12-29-2007, 07:12 AM
#24

Hope this helps some of you. If you need detailed instructions, just ask and I will elaborate. The kit makes for a easy project IMO. I stopped to take pictures and even then I think it took 45 minutes start to finish.
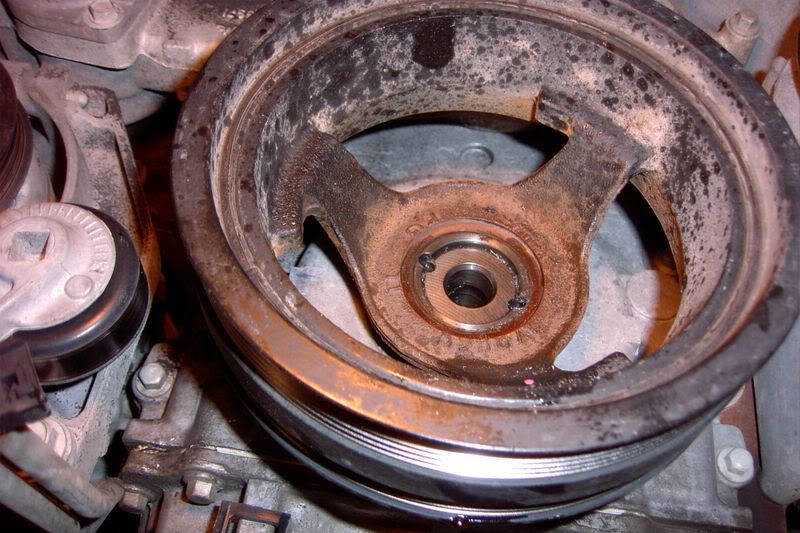
The kit from Magna,... drill bit, reamer, jig, extended bolt to hold jig, new GM crank bolt and the 2 pins:

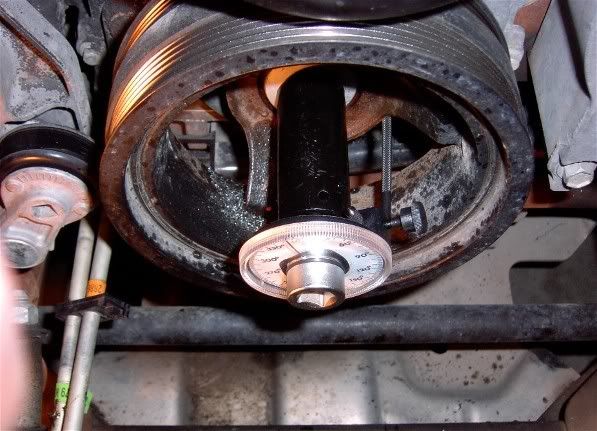
Jig installed ready for a drillin. The drill bit is "stepped" and will stop penetrating at the correct depth so that you do not have to worry about drilling too deep. Finally once the holes are drilled, reaming (to square off the bottom of the drilled holes so that the pins seat flush on the bottom):

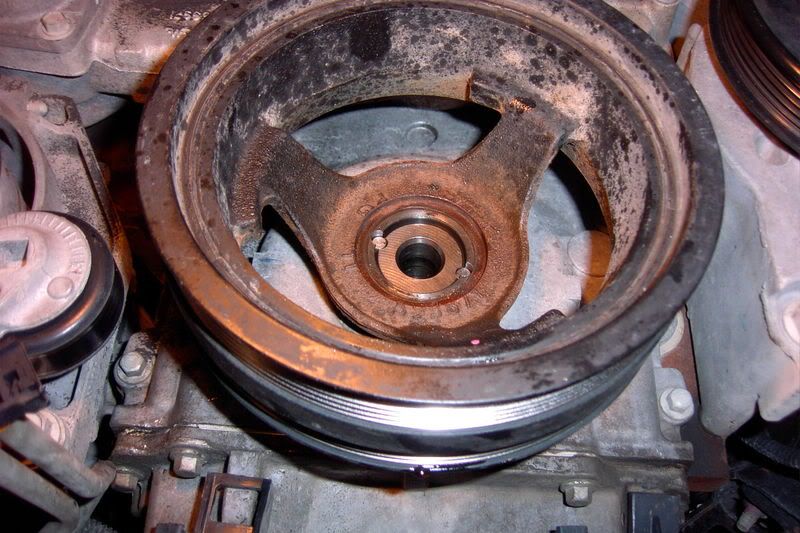
Holes drilled for pins, note that they split the difference between the crank and the pulley. I used carb cleaner with the little red tubing that it comes with to blow out and clean the holes or debris:

Pins installed in the newly drilled holes. They fit snug so a light tap will be required to seat them fully:

In the absence of a Tq angle meter, chalk a line for your "0*" point after the initial Tq of 37 #ft,...USE A NEW BOLT. It is hard to see but I have a line across the bolt head and the pulley:

Torque to yield 140* past your zero mark as per GM specs:

The kit from Magna,... drill bit, reamer, jig, extended bolt to hold jig, new GM crank bolt and the 2 pins:
Jig installed ready for a drillin. The drill bit is "stepped" and will stop penetrating at the correct depth so that you do not have to worry about drilling too deep. Finally once the holes are drilled, reaming (to square off the bottom of the drilled holes so that the pins seat flush on the bottom):
Holes drilled for pins, note that they split the difference between the crank and the pulley. I used carb cleaner with the little red tubing that it comes with to blow out and clean the holes or debris:
Pins installed in the newly drilled holes. They fit snug so a light tap will be required to seat them fully:
In the absence of a Tq angle meter, chalk a line for your "0*" point after the initial Tq of 37 #ft,...USE A NEW BOLT. It is hard to see but I have a line across the bolt head and the pulley:
Torque to yield 140* past your zero mark as per GM specs:
Last edited by krambo; 12-29-2007 at 08:03 AM. Reason: Fixing pictures.

 01-04-2008, 11:36 AM
#28
Launching!
iTrader: (15)

Join Date: Apr 2007
Location: Fontana, CA
Posts: 250
Likes: 0
Received 0 Likes
on
0 Posts
I had to do this for my new Innovators West Crank Pulley (different size pins) as the pin kit used a 3/16" pin and I couldnt find one anywhere. It is the same hardness as the old keyways we used on the small and big blocks. I have a set of the pins here that I could send you but you wont have them very soon because of the holidays.
01-04-2008, 11:55 AM
#29
01-04-2008, 11:59 AM
#30
The pins for the MagnaCharger Kit are .250" thick and .500" long.