ECSB 4WD 4l60E to 4l80E


 11-23-2008, 05:57 AM
#103
TECH Apprentice

You haven't done the transfer case mods yet?
It's alot easier than the rest of the work you've done.
If you need any pic's to help...
http://smg.photobucket.com/albums/v3...243%20rebuild/
My 80E swap pic's.
http://smg.photobucket.com/albums/v3...%20to%204L80e/
One of the best tools I bought was a set of flag tip snap ring pliers!

I coudn't find this front drive shaft yoke seal listed anywhere so I made one. It leaked when I tried to reuse the old one.


You may also want to invest in one of these:
http://www.drivetrain.com/gillies/Tcasesaver.html
I had the machinist at work make me one.
It's alot easier than the rest of the work you've done.
If you need any pic's to help...
http://smg.photobucket.com/albums/v3...243%20rebuild/
My 80E swap pic's.
http://smg.photobucket.com/albums/v3...%20to%204L80e/
One of the best tools I bought was a set of flag tip snap ring pliers!
I coudn't find this front drive shaft yoke seal listed anywhere so I made one. It leaked when I tried to reuse the old one.
You may also want to invest in one of these:
http://www.drivetrain.com/gillies/Tcasesaver.html
I had the machinist at work make me one.
Last edited by howard quick; 11-23-2008 at 06:03 AM.
11-23-2008, 10:12 AM
#104
You haven't done the transfer case mods yet?
It's alot easier than the rest of the work you've done.
If you need any pic's to help...
One of the best tools I bought was a set of flag tip snap ring pliers!
I coudn't find this front drive shaft yoke seal listed anywhere so I made one. It leaked when I tried to reuse the old one.
You may also want to invest in one of these:
Our x-fer cases are somewhat different. The front shaft @ the transfer case is a slip joint so shouldn't run into the seal problem you did.
11-23-2008, 12:40 PM
#106
Couple hours on it so far today. Gonna list everything to do. Lots of threads on what are the steps to pulling a transmission.
EDIT: Under hood. Unhook one post of battery, remove dipsticktube.
1>Drain all fluids. Transmission and Transfer case.
2>Remove drive shafts. Remove straps on rear, pry the joint loose and pull the shaft out of rear of the tranny. Same for front. Remove the straps and pull the shaft out of the transfer case. There is a rubber boot protecting the spline joint at the transfer case. Take a screwdriver and gently pry the boot out of its retaining ring.
3> Remove the y-pipe or whatever exhaust you have running under the transmission. Don't forget to unplug all 4 of the O2 sensors.
Mark your joints on the DS's so you put them back the same. Just in case for vibration.

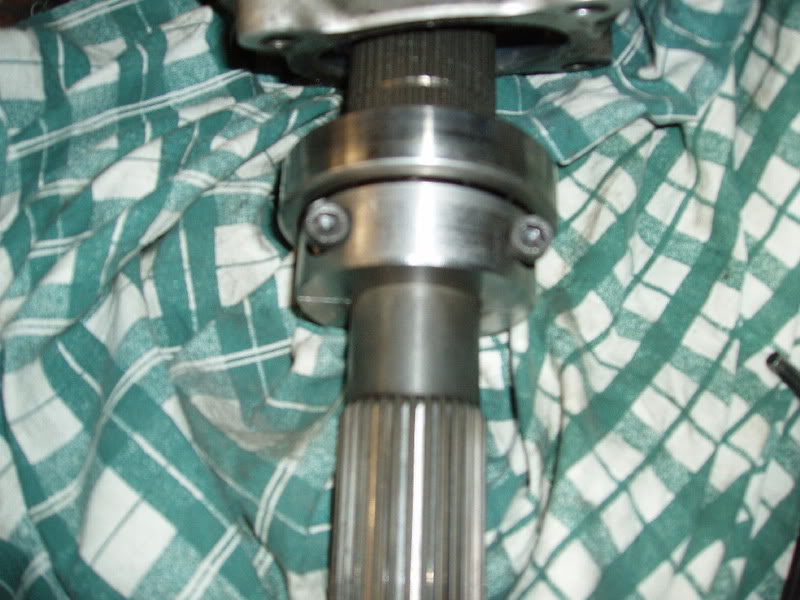
Shot of the transfer case after the front DS is out. Howards' above had a pinion and u-joint. Mine has a slip joint.

All the O2 wiring dangling

Drivers side exhaust out of the way.

Passenger side out of the way.

I've read about guys having to clearance the passenger side of the 80E to clear headers. There is an unused bolt tang and some extra material there. I'm going to trim this off before I put the 80e in. Its close.

EDIT: Under hood. Unhook one post of battery, remove dipsticktube.
1>Drain all fluids. Transmission and Transfer case.
2>Remove drive shafts. Remove straps on rear, pry the joint loose and pull the shaft out of rear of the tranny. Same for front. Remove the straps and pull the shaft out of the transfer case. There is a rubber boot protecting the spline joint at the transfer case. Take a screwdriver and gently pry the boot out of its retaining ring.
3> Remove the y-pipe or whatever exhaust you have running under the transmission. Don't forget to unplug all 4 of the O2 sensors.
Mark your joints on the DS's so you put them back the same. Just in case for vibration.
Shot of the transfer case after the front DS is out. Howards' above had a pinion and u-joint. Mine has a slip joint.
All the O2 wiring dangling
Drivers side exhaust out of the way.
Passenger side out of the way.
I've read about guys having to clearance the passenger side of the 80E to clear headers. There is an unused bolt tang and some extra material there. I'm going to trim this off before I put the 80e in. Its close.
Last edited by KySilverado; 11-23-2008 at 03:20 PM.
11-23-2008, 03:17 PM
#107
Always fun. Getting the torque converter unbolted.
First get the starter and dust cover unbolted.

If you remove the dipstick tube, you can tuck the starter up and out of the way without taking it out. I have however damaged the wiring to the crank sensor 2 times pulling transmissions. Wired a longer pigtail to it last time.

You need to get the TC bolts in about this position to get a socket on it.


Doing it alone I use a screwdrive in the access hole to rotate the engine around to get all the bolts. If you have a buddy a socket on the front of crankshaft would be a better way.

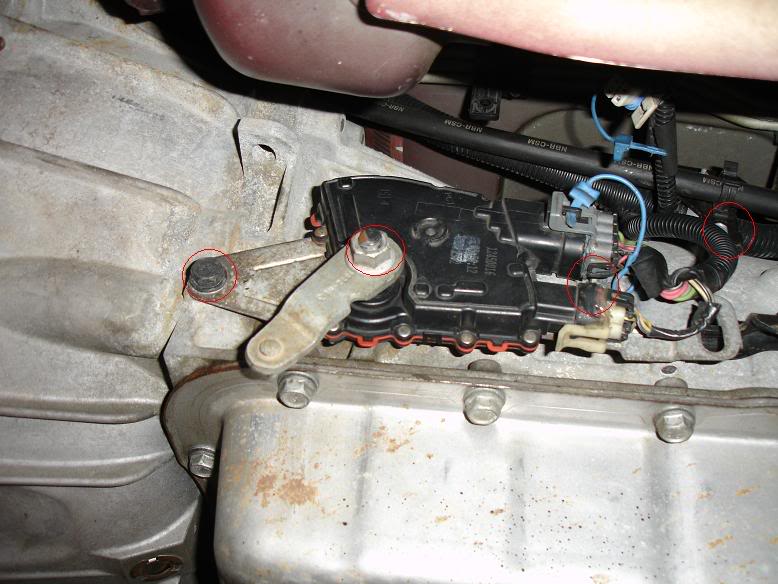
Also got the neutral safety switch pulled off. Remove the circled bolts and pull it off. Also unbolted the bracket that holds fuel lines up in the right corner. Didn't get any pictures of pulling the shifter cable.
First get the starter and dust cover unbolted.
If you remove the dipstick tube, you can tuck the starter up and out of the way without taking it out. I have however damaged the wiring to the crank sensor 2 times pulling transmissions. Wired a longer pigtail to it last time.
You need to get the TC bolts in about this position to get a socket on it.
Doing it alone I use a screwdrive in the access hole to rotate the engine around to get all the bolts. If you have a buddy a socket on the front of crankshaft would be a better way.
Also got the neutral safety switch pulled off. Remove the circled bolts and pull it off. Also unbolted the bracket that holds fuel lines up in the right corner. Didn't get any pictures of pulling the shifter cable.
 11-24-2008, 02:35 PM
#109
TECH Apprentice
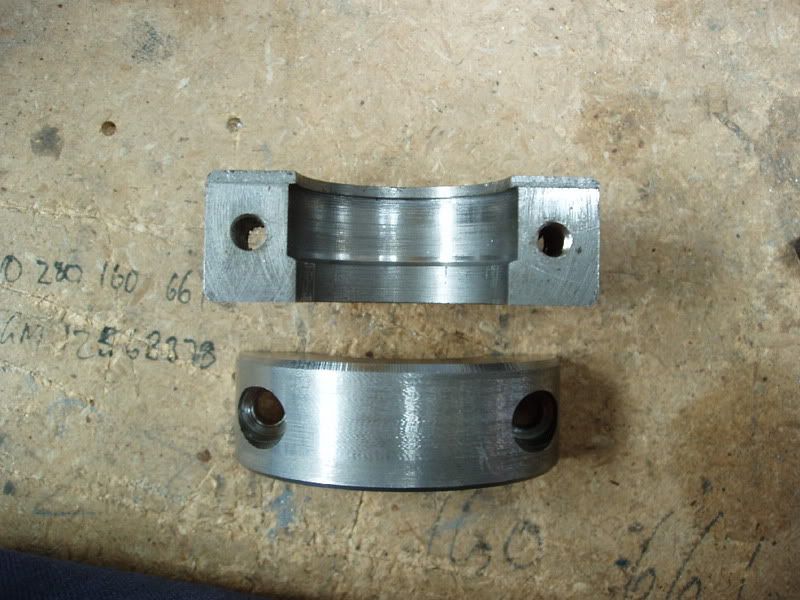
Yes...that's correct. Hold the nut with a spanner and wind the bolt to split the transfer case.
I think I used one on each side. The little tab/piece of aluminium was just to protect the case a little.
I think I used one on each side. The little tab/piece of aluminium was just to protect the case a little.