When you click on links to various merchants on this site and make a purchase, this can result in this site earning a commission. Affiliate programs and affiliations include, but are not limited to, the eBay Partner Network.
2001,
Hmmmm, something seems off. Do you have a brand and product # for the kit you have?
Does your kit include the brackets and u-bolts to relocate the axle over the leaf
Its odd that the hanger would be so long and have 6 mounting holes when the frame only has 4.
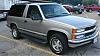
Do you have a picture of the factory hanger mounted to the frame?
I understand the front hanger is welded. I'm quite curious now, huh.
My 99 Tahoe was a 5/7 flip kit came with lift shackle.
Use the supplied lift hanger and it gave me a 5" drop.
Use factory hanger gave me a 7" drop.
It didn't mess with rear leaf mounts at all though.
Yes, Tig. It's McGaughy's Flip Kit 93047. I originally ordered the 11004 kit which had the front hangers and rear shackle, however, as you can see I have that one off wonder ext cab with a crew bed(5'8") which is great as I'm afforded more room in the garage. As you can see, with the welded on Summit was kind enough to take back the brackets of the 11004 kit, I hung on to the spindles; #1 they're heavy and #2 I could use them and just finished rebuilding the front end while I was at it. This 96047 kit does not have a picture of a mounted hanger, I emailed McGaughy and am waiting for a reply, I figure I could take the hangers off in a couple minutes =if need be. Here's where I am so far............. Oh yes- and the bracket actually has 8 holes, allowing the choice of either 4" or 5" drop.....
OK- all good guys; in the instructions, highlighted in red
1. Use wheel chalks to secure the front of the vehicle from rolling/movement.
2. Put jack stands under the rear of the vehicle (frame) lifting only the back of the truck.
3. Place floor jack under the rear-end and use it to relieve pressure on the shackles by jacking up the rear-end.
4. Remove the U-bolts that attach the rear-end to the leaf spring only removing one spring at a time.
5. After the leaf spring is loose, move it underneath the rear-end and re-install the leaf spring. Do not attach the
U-bolts yet.
6. Complete step five (above) for the other leaf spring.
7. Once the rear-end is on top of the leaf spring, install the flip kit between the leaf spring and the rear-end
housing.
8. On the 07 Flip Saddle there are two ears pointing upwards, one wide and one narrow ear. The narrow ear
goes towards the rear of the truck.
9. Once the flip kit is installed on both sides, tighten completely to factory specifications.
10. The stock bump stop assembly needs to be cut off from your frame. You can cut it with a die grinder or
sawzall.
11. The rear-end housing has a flat saddle welded to the top on each side that the original bump stop would
make contact with. At the rear most point drill a 3/8� hole and install the hexagon shaped bump stop and tighten
nut down (supplied with kit).
12. Check that no brake lines or wires may interfere with any part of the rear-end housing, if so, move them
accordingly.
13. Remove rivets on the factory shackle-hanger located at the rear of the truck. This is the bracket that the rear
shackles bolt to. Once the bracket is loose from the frame, remove the shackle bolt and bracket. The new
McGaughy�s shackle-hanger lowers the rear of the truck either four inches or five inches depending on the hole
used. If you move the bracket to the top of the frame, the truck will be lowered five inches. If you move the
bracket down from the five inch drop position and use the top hole then the truck will be lowered four inches.
*(Now your shackle points downward, originally it pointed upward.)*
14. Bolt the bracket back to the shackle using the stock hardware, don�t tighten it yet.
15. Use the provided McGaughy�s hardware to install the new shackle-hanger to the frame using the original
hanger holes. The top back hanger hole originally should have an existing bolt already, reuse this bolt in the
same original position.
Tighten step #14 now, make sure all shackle and hanger bolts are tightened. Double check that the U-bolts are
also tightened. Be sure you put both hangers (left & right side) on the same hole in the hanger.
16. Re-install your wheels and torque to factory specifications. Release the floor jack and set the vehicle on the ground.

 07-29-2017, 03:49 PM