Cam swap sticky?
 03-23-2020, 10:04 PM
#1
On The Tree
Thread Starter

Join Date: Jan 2014
Posts: 115
Likes: 0
Received 0 Likes
on
0 Posts
Cam swap sticky?
hey guys it's been about 6 years since I have done a cam swap in my last truck.
I'm getting ready to do a cam in my show truck on Wednesday and I just wanted to brush up on a few things to make the day go smoother.
I searched around but could not find a sticky for the cam swap just wondering if someone could point me in the right direction
 03-24-2020, 01:19 AM
#2
100% Redneck

Not sure there is a cam sticky. You didn't say what year truck?
I just swapped mine so most is still fresh in my mind (GMT-800)
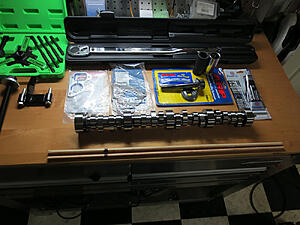
Special Tools:
Torque Wrench that will read at least 250 ft/lbs (old balancer bolt needs 240 ft/lbs to seat)
LS Ballancer puller (I used OEMTOOLS 25090)
LS Balancer install tool (I used Royalo GM LS Installer)
LS Flywheel Locking Tool (to hold flywheel when torquing balancer)
New GM crank bolt (24mm 6 point socket)
I used ARP 2342503 crank bolt (27mm 12 point socket) or (1-1/6" 12 point socket)
Two three foot length 5/16 dowels cut down a couple inches longer than camshaft (see sharpie marks) to hold up lifters.
New camshaft retainer plate (old plate gasket smashes flat loosing oil pressure) I used MAHLE B31822.
New water pump gaskets.
New front cover gasket & crank seal (I reused mine not that old)
RTV Sealant.
Blue Loctite.
Camshaft.
Remove battery ground cable.
Remove fan shroud, fan and radiator.
Remove serpentine belt.
Remove a/c belt
Remove idler & tensioner pulley's
Remove valve covers, rockers & push rods.
Remove water pump.
Remove Balancer bolt (I used 1/2 drive impact)
Remove Balancer.
Remove Front cover bolts (two are on the oil pain kinda slow getting out)
Turn crank using old crank bolt lining up the timing dots on the crank & cam gear. (it's slow with spark plugs installed)
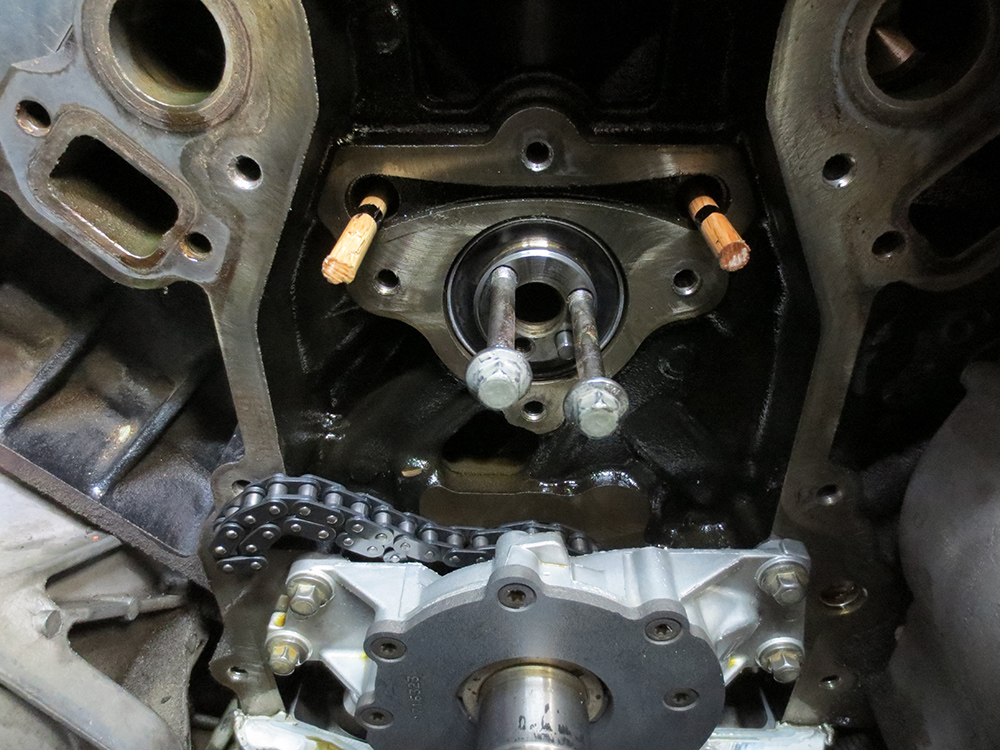
Remove cam gear & lay chain to the side.
Remove cam retainer plate.
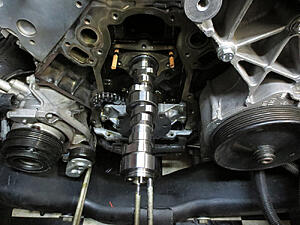
Take two long water pump bolts and thread into camshaft.
ROTATE BOLTS FAST turning the cam so the lifter trays will hold up the lifters (don't let cam walk out, lifters will fall into pan)
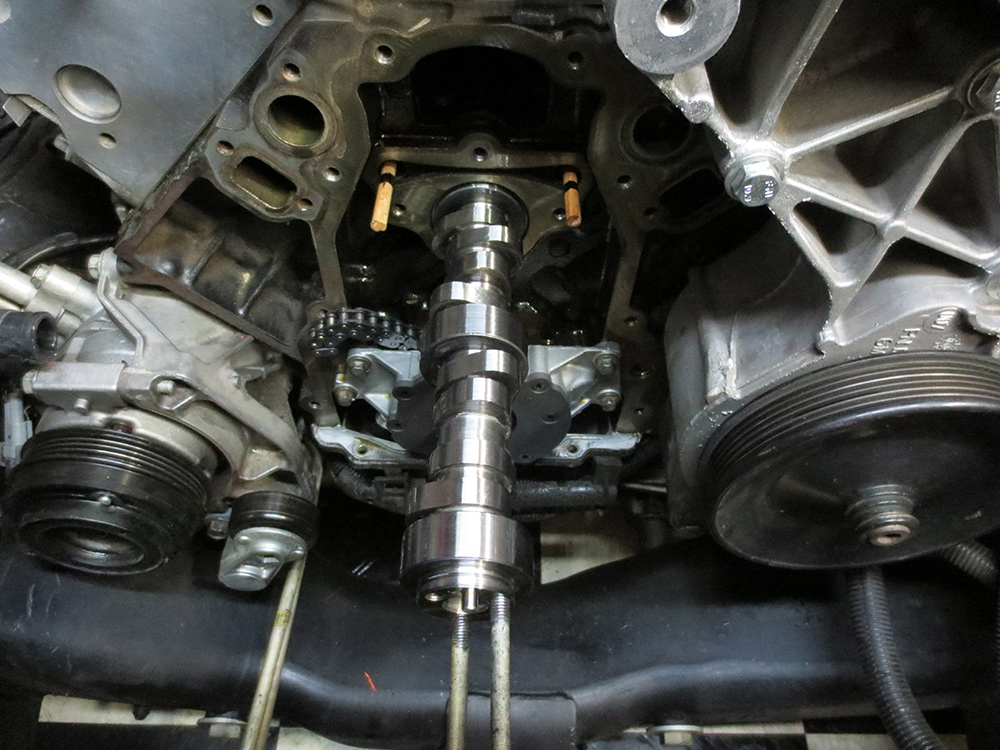
Insert wooden dowels to hold up lifters (if they wont go all the way in remove dowels and repeat above step)

Carefully remove camshaft using water pump bolts (rotate and pull slowly to avoid damaging cam bearings)
Oil and carefully install new camshaft using water pump bolts as a handle.
Remove wooden dowels.
Install new cam retainer plate (tighten bolts to 18ft/lbs)
Line up timing marks.
Install cam gear bolts using blue Loctite (torque to 26 ft/lbs)
Install new front cover gasket.
Place a bead of RTV on the top of the oil pan gasket.
Install front cover and all front cover bolts loosely so cover can move.
Using the balancer install tool get the balancer through the front cover seal.
This lines the cover to the crank to eliminate premature seal wear.
Tighten front cover bolts (torque to 18 ft/lbs)
Using the balancer tool press on the balancer as far as possible.
Remove tool and use OLD crank bolt and torque to 240 ft/lb) to seat balancer.
Remove old bolt and install new bolt.
Tighten crank bolt (50 ft/lbs first pass)
Tighten crank bolt another 140 degrees (mark with a sharpie)
If using ARP bolt simply lube washer and threads and torque to 235 ft/lbs
Reinstall water pump, pulleys & belts (water pump bolts first pass 11ft/lbs second pass 22ft/lbs)
Install push rods & rocker (torque rockers to 22 ft/lb)
Install valve covers, radiator, hoses & coolant.
Tip: hold wooden dowels next to the new camshaft and mark the dowels the same length of the camshaft with a sharpie. This will tell you the dowels are all the way inside and bottoming out (see pic). Just a piece of mind, sure don't want to let those rearward lifters fall down into the oil pan as the cam slides out from underneath.
Manual attached with all the info plus torque specs
I just swapped mine so most is still fresh in my mind (GMT-800)
Special Tools:
Torque Wrench that will read at least 250 ft/lbs (old balancer bolt needs 240 ft/lbs to seat)
LS Ballancer puller (I used OEMTOOLS 25090)
LS Balancer install tool (I used Royalo GM LS Installer)
LS Flywheel Locking Tool (to hold flywheel when torquing balancer)
New GM crank bolt (24mm 6 point socket)
I used ARP 2342503 crank bolt (27mm 12 point socket) or (1-1/6" 12 point socket)
Two three foot length 5/16 dowels cut down a couple inches longer than camshaft (see sharpie marks) to hold up lifters.
New camshaft retainer plate (old plate gasket smashes flat loosing oil pressure) I used MAHLE B31822.
New water pump gaskets.
New front cover gasket & crank seal (I reused mine not that old)
RTV Sealant.
Blue Loctite.
Camshaft.

Remove battery ground cable.
Remove fan shroud, fan and radiator.
Remove serpentine belt.
Remove a/c belt
Remove idler & tensioner pulley's
Remove valve covers, rockers & push rods.
Remove water pump.
Remove Balancer bolt (I used 1/2 drive impact)
Remove Balancer.
Remove Front cover bolts (two are on the oil pain kinda slow getting out)
Turn crank using old crank bolt lining up the timing dots on the crank & cam gear. (it's slow with spark plugs installed)
Remove cam gear & lay chain to the side.
Remove cam retainer plate.
Take two long water pump bolts and thread into camshaft.
ROTATE BOLTS FAST turning the cam so the lifter trays will hold up the lifters (don't let cam walk out, lifters will fall into pan)
Insert wooden dowels to hold up lifters (if they wont go all the way in remove dowels and repeat above step)
Carefully remove camshaft using water pump bolts (rotate and pull slowly to avoid damaging cam bearings)
Oil and carefully install new camshaft using water pump bolts as a handle.
Remove wooden dowels.
Install new cam retainer plate (tighten bolts to 18ft/lbs)
Line up timing marks.
Install cam gear bolts using blue Loctite (torque to 26 ft/lbs)
Install new front cover gasket.
Place a bead of RTV on the top of the oil pan gasket.
Install front cover and all front cover bolts loosely so cover can move.
Using the balancer install tool get the balancer through the front cover seal.
This lines the cover to the crank to eliminate premature seal wear.
Tighten front cover bolts (torque to 18 ft/lbs)
Using the balancer tool press on the balancer as far as possible.
Remove tool and use OLD crank bolt and torque to 240 ft/lb) to seat balancer.
Remove old bolt and install new bolt.
Tighten crank bolt (50 ft/lbs first pass)
Tighten crank bolt another 140 degrees (mark with a sharpie)
If using ARP bolt simply lube washer and threads and torque to 235 ft/lbs
Reinstall water pump, pulleys & belts (water pump bolts first pass 11ft/lbs second pass 22ft/lbs)
Install push rods & rocker (torque rockers to 22 ft/lb)
Install valve covers, radiator, hoses & coolant.
Tip: hold wooden dowels next to the new camshaft and mark the dowels the same length of the camshaft with a sharpie. This will tell you the dowels are all the way inside and bottoming out (see pic). Just a piece of mind, sure don't want to let those rearward lifters fall down into the oil pan as the cam slides out from underneath.
Manual attached with all the info plus torque specs
Last edited by RedXray; 03-24-2020 at 02:20 AM. Reason: spellin

Thread
Thread Starter
Forum
Replies
Last Post