DIY Head porting
 07-14-2013, 01:36 PM
#11
11 Second Club
iTrader: (35)

Join Date: Mar 2004
Location: Vancouver, WA
Posts: 2,017
Likes: 0
Received 0 Likes
on
0 Posts
Dont waste your money on the second pneaumatic grinder. You can adjust the speed with the pressure regulator on the air compressor. Also, Harbor Freight has sales on those die grinders all the time. I've seen them as low as 6.99 with coupons so if you go that route you can buy several of them and keep a bur loaded in each one. Makes switching burs a lot quicker.
Keep in mind the burs are pretty spendy. Plan on spending 15-25 each, and about 20.00 cartridge rolls and a couple mandrels in different lengths. I use the short 5/8 radiused bur for aluminum for working inside the bowl. Works great, cuts fast and is easy to control with the right bit speed. Use that for major shaping, then I switch to a 3/8 radiused mild steel bur for smoothing and final shaping, then use an 80 grit cartridge roll, followed up with 120 grit rolls of varying sizes and shapes. It will take a while to figure out which burs/rolls work best in each area of the runner. Just be patient with it and it will come. Finding the right bit speed is important to control chatter with a bur, and not burn up a roll too quickly.
Mike
 07-14-2013, 02:31 PM
#12

Thanks man. I think I'm going to go electric. That way I can get some porting done at my house instead of having to go to my parents place.
I'm going to probably order this kit from summit:
http://www.summitracing.com/parts/sum-900630
I'll price similar pieces individually and see if I can find it cheaper.
Thanks so much for the help. I truly appreciate it.
I'm going to probably order this kit from summit:
http://www.summitracing.com/parts/sum-900630
I'll price similar pieces individually and see if I can find it cheaper.
Thanks so much for the help. I truly appreciate it.
 07-14-2013, 03:15 PM
#15
11 Second Club
iTrader: (35)
Join Date: Mar 2004
Location: Vancouver, WA
Posts: 2,017
Likes: 0
Received 0 Likes
on
0 Posts
Personally wouldnt waste my money on that Summit kit. Ive tried all those shapes and the only one I liked was the middle bur in that pic. Try finding a place online or locally that selll them individually. That way you're not paying for something you wont use. I'll try to find some online and post pics of the ones Ive tried and like to use regularly. Also, I like to buy the ones with longer shafts and cut them to a length I like.
You could however get a kit with the cartridge rolls. Those come with mandrels and are a decent deal, Standard Abrasives makes a couple kits like that. Again, once you find the rolls you like to use they are cheap to replace, maybe .50 each or so.
Mike
You could however get a kit with the cartridge rolls. Those come with mandrels and are a decent deal, Standard Abrasives makes a couple kits like that. Again, once you find the rolls you like to use they are cheap to replace, maybe .50 each or so.
Mike
07-16-2013, 02:30 PM
#16
11 Second Club
iTrader: (35)
Join Date: Mar 2004
Location: Vancouver, WA
Posts: 2,017
Likes: 0
Received 0 Likes
on
0 Posts
OK, almost forgot to get back with ya on this.
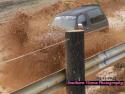
So this is the shape I use initially when shaping the bowl and narrowing the valve guides. I use the aggressive flutes for aluminum and it cuts quick so if you go this route, use caution when first starting. It's easy to remove but you can't put it back once it's gone lol... I use the 5/8" diameter and 2" shank length for easy control. Bur speed is important so play around with it to see what speed it cuts best at without chatter. Let the bur do the work and use a light pressure.
Aluma Burrs
For smoothing and blending after that first bur, I use this one in a 3/8" diameter and a 6" shank length that I cut down to about 4.5". This one is for cast iron/steel but if you coat it with an oil or grease every once in awhile it stays unclogged and does a great job of smoothing over the big divets left by the previous bur.
carbide burrs
I have a few others that I use minimally for matching up the ports to the intakes etc...
After that I just use 80 grit cartridge rolls, followed by 120 grit rolls.
Mike

 Subscribed.