
Finally finished SMC Alky kit install(PICS ADDED)
 10-23-2003, 12:53 PM
#11
Launching!

Join Date: Apr 2003
Location: Orange, CA
Posts: 248
Likes: 0
Received 0 Likes
on
0 Posts
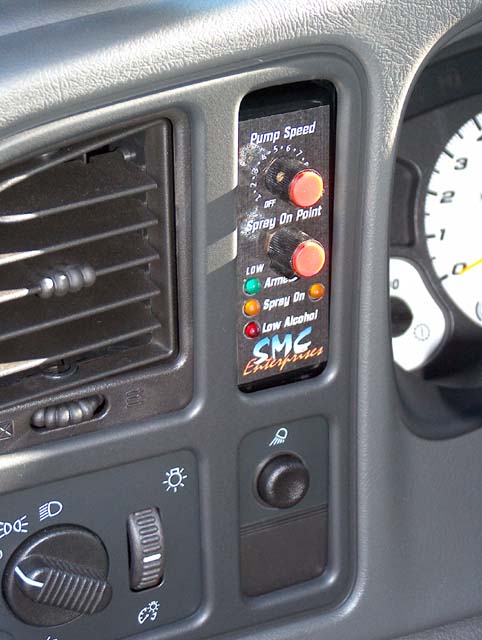
Here's how I mounted my controller. If you take that funny plastic pocket out, the hole is just right for the controller, not cutting or drilling needed 
Mounted my SMC bottle on the passenger's side. You can see it sprays before the throttle body. I would think you would need more pump speed than me, since you are spraying into a compressed air area. And the hotter air at that point should absorb more alcohol than my uncompressed cooler air.
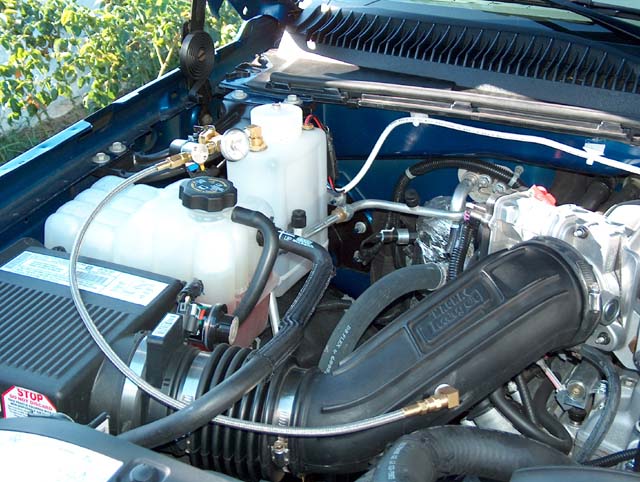
Mounted my SMC bottle on the passenger's side. You can see it sprays before the throttle body. I would think you would need more pump speed than me, since you are spraying into a compressed air area. And the hotter air at that point should absorb more alcohol than my uncompressed cooler air.
 10-23-2003, 01:28 PM
#12

I like the way you have the controller mounted. I was concerned about not being able to get access to the test button on top, but looks like there is enough room to slide a thin piece of plastic or whatever in there to press it. I will be relocating mine now
Did you get an upgraded kit?? I noticed 2 lights by the "spray on" message on the controller.
I think mine requires less pump speed mainly because of it be in more of a liquid state being so close to the intake. Your spraying on the inlet is giving it more time to disipate,by the time it goes through the charger it is in more of a gas form,so more pump speed would be required.
10-23-2003, 04:11 PM
#13
Launching!
Join Date: Apr 2003
Location: Orange, CA
Posts: 248
Likes: 0
Received 0 Likes
on
0 Posts
Oh, I forgot to mention, I had to relocate the connector block on the bottom of the SMC controller to the back. It is just glued on, so I snapped it off and unsoldered the wires, drilled some holes on the back side of the controller and resoldered the wires and re-glued the connector block.
Otherwise you would need to remove some of the dashes plastic bracketry to make it fit. Since I was not sure I would want the controller on permenent display, I decided not to chew my new truck up.
Otherwise you would need to remove some of the dashes plastic bracketry to make it fit. Since I was not sure I would want the controller on permenent display, I decided not to chew my new truck up.
 10-25-2003, 01:14 PM
#15
TECH Addict
iTrader: (4)
Join Date: Dec 2002
Location: Anderson, TX
Posts: 2,775
Likes: 0
Received 0 Likes
on
0 Posts
Originally Posted by gr8twhite
Looks good.Where did you get it and how much was it?How long does the jug last?What kind of alcohol do you use?
 10-25-2003, 01:25 PM
#16
Originally Posted by gr8twhite
Looks good.Where did you get it and how much was it?How long does the jug last?What kind of alcohol do you use?
cost depends on what options you go with . I got the basic kit,runs about $400.00 plus another $50.00 for the solenoid needed for a supercharger kit.
You use regular Denatured alcohol,you can get it at Home Depot and a jug should last about a tank of gas, maybe more or less,depends on how often you put your foot in it.

Thread
Thread Starter
Forum
Replies
Last Post
KyleW707
GM Parts Classifieds
4
07-29-2015 08:17 AM
therock
GM Drivetrain & Suspension
4
07-25-2015 09:23 AM