
Radix Install Tips
 06-26-2004, 03:03 AM
#1
TECH Regular
Thread Starter

Join Date: Apr 2004
Location: La
Posts: 400
Likes: 0
Received 0 Likes
on
0 Posts
Well...mr post man brought me 2 care packages today courtesy of Magnacharger...haha! And i think i've decided to tackle the install myself. for all of you guys that have anyready done it....what are some tips you can give me? any surprises i can expect? any extra tools? i have a few days to prepare....i think im gonna go for it tues-thurs.
also, i know someone posted it before...but what mod has to be done to keep the K&N FIPK shroud and filter?
thanks for the info,
chris
also, i know someone posted it before...but what mod has to be done to keep the K&N FIPK shroud and filter?
thanks for the info,
chris


 06-26-2004, 10:47 AM
#3
Teching In

Join Date: Jun 2004
Location: Spokane, WA
Posts: 20
Likes: 0
Received 0 Likes
on
0 Posts
Watch out for the step about the vaccum hose to the fuel pressure regulator that might not be in your install manual. My manual missed that step, but everything else was perfect.
Just trim and bend a little to make the FIPK shroud fit.
Just trim and bend a little to make the FIPK shroud fit.
06-26-2004, 11:40 AM
#4
TECH Senior Member
iTrader: (1)
Join Date: Jan 2003
Location: Armpit of East TX
Posts: 9,342
Likes: 0
Received 0 Likes
on
0 Posts
It is really a straight forward install. I was shocked at how easy it was. My second one ... I didn't even use the instruction booklet, it's that easy.
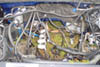
Make sure you have someone help you set the blower on the manifold and DO NOT drag it across. You will crush the gaskets and that might cause problems. Don't forget to hook up the MAP sensor when the wires are going back on. It's in the very back and easy to forget. The water temp sensor is another easy one to pull off and forget about. Other than that ... I think that's about it.
Make sure you have someone help you set the blower on the manifold and DO NOT drag it across. You will crush the gaskets and that might cause problems. Don't forget to hook up the MAP sensor when the wires are going back on. It's in the very back and easy to forget. The water temp sensor is another easy one to pull off and forget about. Other than that ... I think that's about it.
06-26-2004, 03:07 PM
#6
TECH Senior Member
iTrader: (1)
Join Date: Jan 2003
Location: Armpit of East TX
Posts: 9,342
Likes: 0
Received 0 Likes
on
0 Posts
I've always just started up the truck with the resevoir cap off and let it run. It will eventually get all the air out. Just let it run a little while ... long enough to get it up to temperature. Once it's up to temp and you have stopped adding fluid ... cap it off and let it build pressure. It will be more prone to show a leak once the system is pressurized than when it isn't. Once it's built up pressure, look arounmd for fluid, that should tell you if there is any leaks or not.
Trending Topics
06-26-2004, 10:39 PM
#8
TECH Regular
Join Date: Apr 2004
Location: Norman, OK
Posts: 470
Likes: 0
Received 0 Likes
on
0 Posts
Install is cake. I followed the instructions carefully, very carefully, and double checked every step. I called magna a couple times to double check their directions, but it only took me 8 hours to get it up and running. I think the radiator took the most amount of time.
06-26-2004, 10:53 PM
#9
12 Second Club
Join Date: Sep 2003
Location: Texas
Posts: 1,658
Likes: 0
Received 0 Likes
on
0 Posts
anybody have any info about what kind of brackets to use when mounting the H/E behind the bumper/valence? I'm thinking I'll have to ghetto rig something for the time being and later get some measurements and fab something up...
Its good to hear how easy it is to install. The instructions seem very thorough.
Its good to hear how easy it is to install. The instructions seem very thorough.
06-27-2004, 12:03 AM
#10
TECH Senior Member
iTrader: (1)
Join Date: Jan 2003
Location: Armpit of East TX
Posts: 9,342
Likes: 0
Received 0 Likes
on
0 Posts
There are 2 silver parrel looking things with some long bolts. Those barrels will hold the bracket for the H/E out far enough to clear the tranny cooler. THat's what they are for.