
Radix Install Tips
 06-27-2004, 04:50 AM
#11
TECH Regular
Thread Starter

Join Date: Apr 2004
Location: La
Posts: 400
Likes: 0
Received 0 Likes
on
0 Posts
oh yeh.....i dont expect it to be a problem. but my BBK 80mm throttle body will bolt right up the the radix, correct? i am double checking on everything b4 i start.
thanks again for the help guys!
thanks again for the help guys!

 06-27-2004, 12:16 PM
#13
12 Second Club
Join Date: Sep 2003
Location: Texas
Posts: 1,658
Likes: 0
Received 0 Likes
on
0 Posts
Originally Posted by Flyer
There are 2 silver parrel looking things with some long bolts. Those barrels will hold the bracket for the H/E out far enough to clear the tranny cooler. THat's what they are for.
06-27-2004, 12:30 PM
#14
TECH Senior Member
iTrader: (1)
Join Date: Jan 2003
Location: Armpit of East TX
Posts: 9,342
Likes: 0
Received 0 Likes
on
0 Posts
Yes ... run the H/E in front of everything else. The trans coller will bne around 180* or so. The air off of it would ruin the effiency of the H/E and may even make the water temps go up.
06-27-2004, 11:13 PM
#15
12 Second Club
Join Date: Sep 2003
Location: Texas
Posts: 1,658
Likes: 0
Received 0 Likes
on
0 Posts
will the trans cooler still get enough air to it? I've heard the factory trans cooler isn't all that great, at least compared to aftermarket ones, and I dont want to make it even worse, especially if the H/e is sending hot air into it....
I might spend an extra hour or so fabbing up some brackets to mount it down low, even though I dont like the idea of hitting a tire on the freeway and demolishing the heat exchanger
I might spend an extra hour or so fabbing up some brackets to mount it down low, even though I dont like the idea of hitting a tire on the freeway and demolishing the heat exchanger
06-27-2004, 11:18 PM
#16
TECH Senior Member
iTrader: (1)
Join Date: Jan 2003
Location: Armpit of East TX
Posts: 9,342
Likes: 0
Received 0 Likes
on
0 Posts
The air off the H/E is about 120 max. I have a water temp gauge on mine and it never gets on the midway mark between 100 and 150, even pushing 8.5 psi.
The trans cooler is fine where it is. I would recommend getting a better one anyways, but the stock one will get you by.
The trans cooler is fine where it is. I would recommend getting a better one anyways, but the stock one will get you by.
06-29-2004, 07:30 PM
#17
Teching In

Join Date: Jun 2004
Posts: 4
Likes: 0
Received 0 Likes
on
0 Posts
I installed my Radix last Novemeber & the big things I can recall that the instructions weren't clear on were that 1) Included in the kit are extentions for the factory wiring + crimp connectors for the electrical side of things (I ended up removing the tape & conduit from several of the factory harnesses to stretch/fit the wires before realizing that extenders were included) 2) you're going to have to notch the back of the grill before you re-install it to fit over the intercooler (at least on GMC's, had to cut mine) 3) the instructions didn't mention re-connecting the vaccuum hose from the fuel pressure regulator to a fitting on the back of the s/c intake on the driver's side. These instructions were all missing from my install manual. I'd consider myself an experienced shade tree mechanic & the install took a good day and a half for me working slowly/carefully. Also, make sure you have replacement coolant on hand if you don't want to re-use the stuff you drained from the radiator. I used the green stuff for the intercooler system & orange stuff for the vehicle cooling system. Another tip would be to take several digital pictures/Polariods of the old setup & new unit from several angles before you start so you can reference fittings & where they should connect to before you can't see them anymore... as well as labeling everthing that you remove so you can remember where they came from/go back to.
A Dremmel tool came in very handy to grind down some of the alternator bracket & also cutting the grill-- would also be good for dealing with the EGR tube/AIR injection system if you have those (I don't). More good tools to have would be a serpentine belt install/removal tool (made belt removal and install a snap) & also you'll *need* an inch-lbs torque wrench.
The truck will run like crap until you install the Superchips tuning near the very end of the install & it will stink for a few miles while the goopy lube inside the s/c burns off a few miles later. BTW, that Superchips tune will run pretty rich & will foul up your exhaust tip(s) quickly. You'll notice a plume of gas out of your exhaust when hitting boost hard. I reccomend switching to Denso Iridium IT20 plugs gapped at .035" (or the NGK's/whatever upgrade you want) sometime down the road, they helped my truck run much smoother after the Radix. A Nelson tune will help with the A/F ratio & running rich/exhaust fouling. If you don't have your tranny beefed up already, prepare to have it rebuilt soon... the good thing is that the cost of a rebuild is pretty much the same whether or not the tranny is messed up-- just wait for it to go before the rebuild like I did, same price to fix. I've been fine since my unit was rebuilt with redline clutches, hi-po bands, trans-go, latest gm updates, and a vette servo about 6 months ago. I cracked the aluminum case, burned up the 2-4 (I think) band & destroyed the stock torque converter about 1000 miles after the Radix install. G80 (surprise!) is still holding in there quite well. Just don't drive stupid around corners or let an airborn wheel revv wildly & then slam down to grab traction. I've blow up G80's in the past hot-rodding around, just use common sense and you should be fine. If/when my current G80 blows up I'll put a real Eaton posi in there. If I were to do the tranny rebuild again, I'd go for a mild stall vs. a "racing" hardened factory stall... or swap the whole thing out for a 4L80E to begin with vs. throwing money into the 4L60E that may not last(?).
If you bought gauges to compliment your Radix, I have a few tips for boost gauge installs as well as fuel pressure gauges (PITA)... just email me & I'll share my experiences with those as well.
Anyhow, the Radix system is awesome & I'm sure you'll love it. It'll seem extremely fast for the first few weeks I logged several thousand miles on mine before I started looking for more performance... BTW, gas mileage didn't change much at all for me after the install; I always have my foot in it too.
-brandon
A Dremmel tool came in very handy to grind down some of the alternator bracket & also cutting the grill-- would also be good for dealing with the EGR tube/AIR injection system if you have those (I don't). More good tools to have would be a serpentine belt install/removal tool (made belt removal and install a snap) & also you'll *need* an inch-lbs torque wrench.
The truck will run like crap until you install the Superchips tuning near the very end of the install & it will stink for a few miles while the goopy lube inside the s/c burns off a few miles later. BTW, that Superchips tune will run pretty rich & will foul up your exhaust tip(s) quickly. You'll notice a plume of gas out of your exhaust when hitting boost hard. I reccomend switching to Denso Iridium IT20 plugs gapped at .035" (or the NGK's/whatever upgrade you want) sometime down the road, they helped my truck run much smoother after the Radix. A Nelson tune will help with the A/F ratio & running rich/exhaust fouling. If you don't have your tranny beefed up already, prepare to have it rebuilt soon... the good thing is that the cost of a rebuild is pretty much the same whether or not the tranny is messed up-- just wait for it to go before the rebuild like I did, same price to fix. I've been fine since my unit was rebuilt with redline clutches, hi-po bands, trans-go, latest gm updates, and a vette servo about 6 months ago. I cracked the aluminum case, burned up the 2-4 (I think) band & destroyed the stock torque converter about 1000 miles after the Radix install. G80 (surprise!) is still holding in there quite well. Just don't drive stupid around corners or let an airborn wheel revv wildly & then slam down to grab traction. I've blow up G80's in the past hot-rodding around, just use common sense and you should be fine. If/when my current G80 blows up I'll put a real Eaton posi in there. If I were to do the tranny rebuild again, I'd go for a mild stall vs. a "racing" hardened factory stall... or swap the whole thing out for a 4L80E to begin with vs. throwing money into the 4L60E that may not last(?).
If you bought gauges to compliment your Radix, I have a few tips for boost gauge installs as well as fuel pressure gauges (PITA)... just email me & I'll share my experiences with those as well.
Anyhow, the Radix system is awesome & I'm sure you'll love it. It'll seem extremely fast for the first few weeks
I logged several thousand miles on mine before I started looking for more performance... BTW, gas mileage didn't change much at all for me after the install; I always have my foot in it too.-brandon
06-29-2004, 09:50 PM
#18
12 Second Club
Join Date: Sep 2003
Location: Texas
Posts: 1,658
Likes: 0
Received 0 Likes
on
0 Posts
Originally Posted by swickerath
you'll *need* an inch-lbs torque wrench.
I cracked the aluminum case, burned up the 2-4 (I think) band & destroyed the stock torque converter about 1000 miles after the Radix install.
I have a Transgo, aluminum accumulator pistons, Yank3k and Eaton posi and I take it pretty easy on the truck most of the time, any bets on how long my trans will last??
If you bought gauges to compliment your Radix, I have a few tips for boost gauge installs as well as fuel pressure gauges (PITA)... just email me & I'll share my experiences with those as well.
Thanks for your input, I should be installing my kit this week
06-30-2004, 02:50 PM
#19
Teching In
Join Date: Jun 2004
Posts: 4
Likes: 0
Received 0 Likes
on
0 Posts
The torque for some of the bolts is so low that the ft/lbs wrench probably won't measure anything. The only bolts I really cared to get spot-on torque-wise were the intake bolts (10 of them) that are suggested to be torqued to 89 inch/lbs- that's 7.4 ft/lbs I believe. A few of the other bolts are "supposed" to be torqued to 40 & 50 inch/lbs. The chain auto parts stores near me carry some really cheap inch/lbs wrenches (Murray's & Auto Zone have them, Car Quest, Napa, et. al didn't... neither did Sears). If you can't find the correct torque wrench just use your best judgement-- "snug" is usually good enough, just double check them after a few miles & then again after another week or two.
The Yank3K TC will be much harder on the trans than the stock converter, you'll be right in your powerband at launch-- but my guess is that you should be OK for quite some time. I've been thinking about adding a bigger trans cooler to my truck (the temps rise pretty quickly when you're abusing it) if you don't have a cooler, consider adding one.
The biggest pains that I had with my AutoMeter boost & pressure gauges were figuring out how to connect the pressure gauge's sending unit, how & where to wire the things & also mounting my A-pillar gauge pod. My boost/vac gauge was messed up from the factory (waaay off zero), so I'm getting that fixed & have put in a VDO boost gague for the time being. The VDO gauge is super deep when the fittings are connected, had to cut a rather large hole in my stock A-Pillar cause the unit stuck way past the back of the pod when installed. I think the AutoMeter boost gauge would also have required some trimming, I remember it kinking the nylon tube when fully seated in the pod.
A little short on time right now, but I'll post some pics & instructions on what I ended up doing in a few hours. Check your fuel pressure gauge to see if the sending unit has a 1/8" NPT male connector (if it's an AutoMeter gauge it likely is). You'll need two adapters to properly connect the unit to your schrader valve. Here are the part #'s from two different racing catalogs (same Earl's plumbing) and should run < $30 for both at either shop:
Summit Racing part #'s
EAR-991001
EAR-923104
Jeg's part #'s
361-991001
361-923104
You *might* be able to assemble a similar setup locally if you have a hydraulic supply shop nearby. Basically you need to connect a -4 AN male to 1/8 NPT male with a 90 degree bend in there somewhere. Don't bother with the auto parts stores, they don't know what AN fittings are & they'd have to order the Earls parts for you if you gave them the numbers... save time and just order them yourslef
AutoMeter also reccomends liquid teflon to seal the threads of the NPT fittings (NOT the AN fitting, that's a compression fitting). I bought that at a local hardware store. If your boost gauge came with nylon tubing, you may wish to consider ditiching it for real vaccuum tubing, I wish I did, that stuff kinks really easily.
-brandon
06-30-2004, 08:33 PM
#20
Teching In
Join Date: Jun 2004
Posts: 4
Likes: 0
Received 0 Likes
on
0 Posts
OK, here are some quick install pics. Keep in mind, this is just what I did & since I didn't design the electrical system of this vehicle I can't say for sure if there will be long or even short term consequences for any of the following instructions. Please use some common sense when wiring  I will say that I researched the heck out of this stuff before I started cutting wires & believe this is a pretty solid way to get the job done .
interior.jpg, a pic of my interior & some key locations for the gauge install.
firewall.jpg, a pic of where to drill the firewall for wiring. There is a padded noise/heat barrier covering the spot you need to drill- simply unscrew the fastener that's just to the right of the yellow circle & fold this padded whatever it is to the side. You'll see a divit in the firewall right about where the circle is-- drilling here lines right up with an access panel on the inside of the truck (at least for me it did... make sure things look right before drilling your truck). I drilled a few progressively larger pilot holes before punching through with a 1" bit. I also had to use my super old "wimpy" cordless drill for this task, since my normal sized cordless drill & corded model were too big to manuver the bit into this tight spot to drill.
firewall_interior.jpg, a pic under my dash & the best place to run aftermarket wires to the engine bay
fuel_pressure_sender.jpg, a pic of my installed AutoMeter fuel pressure gauge & Earl's adapters to make it fit. Notice that the 90 degree adapter is just the right size-- any longer & it would hit the coil and not fit. The adapter/unit connects right to the fuel pressure test port/schrader valve. You'll need to remove the needle from this valve with either the proper tool (I bought a cheap-o tool from the auto parts store & had to modify it by cutting off the "T" handle to let it reach all the way in there) or with some very small needle nose pliers. Before removing the needle, be sure to release the fuel pressure by first uncapping your gas tank, then putting a shop towel over this fitting & depressing the needle with a small screwdriver/punch/whatever to let the pressure out. I let my truck sit overnight before doing this & there was very little pressure.
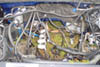
boost_t_fitting.jpg, where I tapped into the vaccuum lines for my boost gauge. This is the fuel pressure regulator & the other end of the hose goes directly into the back of the RADIX manifold... works like a champ.
The pic labeled interior.jpg has a few numbers on it, here are the explanations:
1) A-pillar removal. Grab where the 1 in the pic is and pull towards the passenger side of the truck and the top of the pilliar will come out of the clip. Once the top is loose, grab the lower part of the pillar cover near the windshield and pull up... now that the trim has been removed it's easier to run your wires & also much easier to drill the pillar cover off the truck. I reccomend cutting a 1.5" or so hole in this trim piece to start, you may have to make additional cuts down the road as needed, but definatley make sure your gauge pod will cover the hole when mounted before you start hacking away!
2) Fuse panel cover, pull from the bottom out to release the two bottom clips, then gently pull the top two clips out. This will give you room when running wires up to the A-pillar. Under this cover is also the fuse block that I spliced into, although on back side of it.
3) Headlight/dimmer pod. You'll need to remove the dash bezel to get at this unit - firmly pull straight out along the bezel, starting around the top near the speedo. There are several clips around the bezel (at least 8), but it comes off pretty easily. You'll have to tilt your steering wheel all the way down, as well as set the parking brake & put the gear selector in "1" to have enough room to clear the steering column when taking the bezel off. Take care to cover the hazzard switch with something soft, you _will_ contact this switch when removing the bezel & you could scratch the finish (I use the rubber cap the dealer left on this piece when I took delivery of the truck). Once the bezel is off, you can get at the dimmer pod & it slides out while relieving pressure from the plastic clips holding it to the dash. On the back of the dimmer swich is a wiring harness that I tapped into for 12V w/variable dimmer voltage for the gauge lighting. This is the GREEN wire on the harness. There is also is a good ground to use on this harness, it's BLACK. I tied both of my gauge lights to these wires, as well as used the black wire for the fuel pressure sending unit ground.
4) The number 4 in the pic is located where the back of the fuse panel for the ignition +12V is. You'll need to remove the bottom dash panel to gain access to the fuse block. There are 4 (7mm?) bolts on the bottom of this panel & two clips on the top. With this panel removed, you can see the back of the fuse block-- the PINK wires should be ignition 12V (only output voltage when the ignition is on). Pick a pink wire & test the voltage with a meter to make sure it's putting out the voltage you want, when you want it. I believe I picked the pink wire that allowed me the most access without having to remove the fuse center (I tried, it's in there good!).
5) 5 is actually under the dash, not visible unless you lie on the floorboard and look up. This is where you can drill / pass wires through the firewall. It is directly to the right & just a little bit higher on the firewall than the big bundle of wires GM is passing through. Convieniently, GM put a round cutout in the interior plastic with a handle on it so you can pull it back & gain access to the metal firewall. They were also so kind to divit the metal in the firewall behiend this panel so you can zero in on this exact location & drill through from the engine bay and not wonder what's on the other side, nor fuss with walking a drill bit all around the firewall trying to start a pilot hole.
Good luck with the install!!!!
-brandon
I will say that I researched the heck out of this stuff before I started cutting wires & believe this is a pretty solid way to get the job done .interior.jpg, a pic of my interior & some key locations for the gauge install.
firewall.jpg, a pic of where to drill the firewall for wiring. There is a padded noise/heat barrier covering the spot you need to drill- simply unscrew the fastener that's just to the right of the yellow circle & fold this padded whatever it is to the side. You'll see a divit in the firewall right about where the circle is-- drilling here lines right up with an access panel on the inside of the truck (at least for me it did... make sure things look right before drilling your truck). I drilled a few progressively larger pilot holes before punching through with a 1" bit. I also had to use my super old "wimpy" cordless drill for this task, since my normal sized cordless drill & corded model were too big to manuver the bit into this tight spot to drill.
firewall_interior.jpg, a pic under my dash & the best place to run aftermarket wires to the engine bay
fuel_pressure_sender.jpg, a pic of my installed AutoMeter fuel pressure gauge & Earl's adapters to make it fit. Notice that the 90 degree adapter is just the right size-- any longer & it would hit the coil and not fit. The adapter/unit connects right to the fuel pressure test port/schrader valve. You'll need to remove the needle from this valve with either the proper tool (I bought a cheap-o tool from the auto parts store & had to modify it by cutting off the "T" handle to let it reach all the way in there) or with some very small needle nose pliers. Before removing the needle, be sure to release the fuel pressure by first uncapping your gas tank, then putting a shop towel over this fitting & depressing the needle with a small screwdriver/punch/whatever to let the pressure out. I let my truck sit overnight before doing this & there was very little pressure.
boost_t_fitting.jpg, where I tapped into the vaccuum lines for my boost gauge. This is the fuel pressure regulator & the other end of the hose goes directly into the back of the RADIX manifold... works like a champ.
The pic labeled interior.jpg has a few numbers on it, here are the explanations:
1) A-pillar removal. Grab where the 1 in the pic is and pull towards the passenger side of the truck and the top of the pilliar will come out of the clip. Once the top is loose, grab the lower part of the pillar cover near the windshield and pull up... now that the trim has been removed it's easier to run your wires & also much easier to drill the pillar cover off the truck. I reccomend cutting a 1.5" or so hole in this trim piece to start, you may have to make additional cuts down the road as needed, but definatley make sure your gauge pod will cover the hole when mounted before you start hacking away!
2) Fuse panel cover, pull from the bottom out to release the two bottom clips, then gently pull the top two clips out. This will give you room when running wires up to the A-pillar. Under this cover is also the fuse block that I spliced into, although on back side of it.
3) Headlight/dimmer pod. You'll need to remove the dash bezel to get at this unit - firmly pull straight out along the bezel, starting around the top near the speedo. There are several clips around the bezel (at least 8), but it comes off pretty easily. You'll have to tilt your steering wheel all the way down, as well as set the parking brake & put the gear selector in "1" to have enough room to clear the steering column when taking the bezel off. Take care to cover the hazzard switch with something soft, you _will_ contact this switch when removing the bezel & you could scratch the finish (I use the rubber cap the dealer left on this piece when I took delivery of the truck). Once the bezel is off, you can get at the dimmer pod & it slides out while relieving pressure from the plastic clips holding it to the dash. On the back of the dimmer swich is a wiring harness that I tapped into for 12V w/variable dimmer voltage for the gauge lighting. This is the GREEN wire on the harness. There is also is a good ground to use on this harness, it's BLACK. I tied both of my gauge lights to these wires, as well as used the black wire for the fuel pressure sending unit ground.
4) The number 4 in the pic is located where the back of the fuse panel for the ignition +12V is. You'll need to remove the bottom dash panel to gain access to the fuse block. There are 4 (7mm?) bolts on the bottom of this panel & two clips on the top. With this panel removed, you can see the back of the fuse block-- the PINK wires should be ignition 12V (only output voltage when the ignition is on). Pick a pink wire & test the voltage with a meter to make sure it's putting out the voltage you want, when you want it. I believe I picked the pink wire that allowed me the most access without having to remove the fuse center (I tried, it's in there good!).
5) 5 is actually under the dash, not visible unless you lie on the floorboard and look up. This is where you can drill / pass wires through the firewall. It is directly to the right & just a little bit higher on the firewall than the big bundle of wires GM is passing through. Convieniently, GM put a round cutout in the interior plastic with a handle on it so you can pull it back & gain access to the metal firewall. They were also so kind to divit the metal in the firewall behiend this panel so you can zero in on this exact location & drill through from the engine bay and not wonder what's on the other side, nor fuss with walking a drill bit all around the firewall trying to start a pilot hole.
Good luck with the install!!!!
-brandon