
Tips / Tricks / HowTo's
 11-08-2006, 07:51 PM
#11
TECH Fanatic
iTrader: (9)
Join Date: May 2005
Location: Longview, TX
Posts: 1,085
Likes: 0
Received 0 Likes
on
0 Posts
Remove fan shroud, and leave the serp. belt installed. Take a large punch and place it on the part of the clutch that threads on the pulley. Give it a good wack with a hammer. Now take a cresent wrench big enough to fit on the clutch and using a dead blow hammer strike the end of the wrench so that when hit it moves towards the air filter box. It usually only takes a few hits. This method is near impossible if you don't hit it with the punch first, doing so is almost the only way to get it of without a strap wrench or a fan clutch tool.
 12-12-2006, 09:40 AM
#12
TECH Fanatic
iTrader: (15)

Join Date: Oct 2006
Location: Texas
Posts: 1,601
Likes: 0
Received 0 Likes
on
0 Posts
I'm going to install LS1 fans on my 04 Silverado 5.3 today. I know a lot of us have lots of questions on how this is done. As I do this I will be posting pics of everything required and that needs to be done. To start off with I have:
1 efans off of a 98 vett.($120)

2 Wiring harness from nelson performance.($100? this seams like a mistake I'll
Call them)
3 PCM reflased to activate the LS1 fan.($65 by pcm for less because I
needed other things done but nelson offered to do it for 25 + shipping)
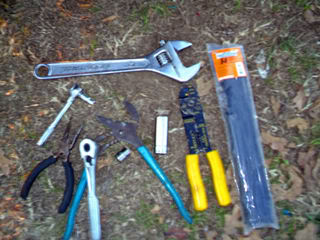
4 tools You'll need some pliers, needle nose pliers, zip ties, flat head screw driver, wire stripers,7mm socket,10mm socket,8mm socket, I used the dummy wrench, hammer, 12inch metal rode.
5 Step 1 remove fans shroud you have two 10 mm screws up top take those out. Then take plastic ring holding water hose off of the fan shroud by pulling it out. and on the right side you have another hose sitting on the shroud move it. and you have to plastic pins that hold your fan shroud to the bottom take those off and your top portion of the fan shroud should come right out.

6 Then you have two more 10mm screws one and each side of the bottom part of fan shroud remove those and turn the shroud clock wise and it should come right out be sure your hoses are out of the way
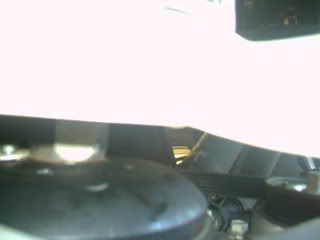
7 Now remove the fan to do this take a long socket extension and place it on the bolt that attaches the fan to the water pump pulley as shown below. Take the hammer and hit the extension to try to make the bolt com off counter clockwise. Once you knock it loose you should be able to take you had and turn the fan counter clock wise until it's off. Or you can uses a long wrench and hit it to do the same thing.
8 Now disconnect your battery to avoid burning anything up.
9. Take your wiring harness and get the two red cables and connect them to the red box by your alternator on driver�s side by opening the box. Remove the 17mm nut and place your two red wires there and put the nut back on. Close the box.
10 Now take your two black wires and remove a 10mm bolt that holds the red box. Place the screws threw the two black wire rings and tighten it down.

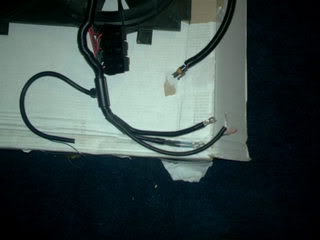
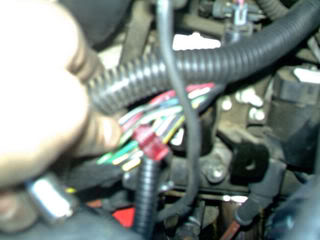
11. Now we'll install the AC fan 12V wire. There is a group of wires that runs up between the place you grounded and the red box. Take this and remove the loom so you can see the wires. I had 2 green wires the thicker of the two is the one you�re going to tap into.
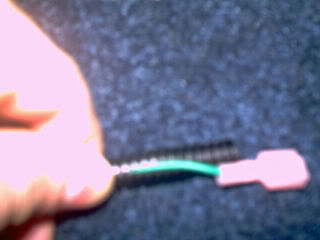
So strip a little off of the green wire and tap the wiring harness green wire to it.
12 PCM install
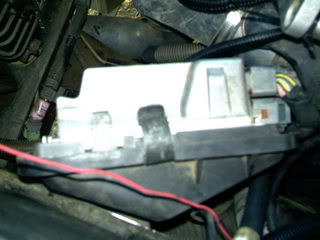
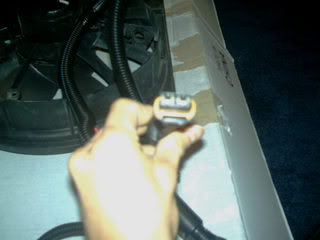
On the drivers side you have your pcm covered by a black plastic near the radiator remove this cover. Should look like this after removed.
Pop the top clip with a flat screw driver to remove pcm to view the two 7mm bolts on back.

Remove those bolts until the pcm is completely disconnected. Then take the pliers and squeeze gently the blue connection on the back to access the wires.
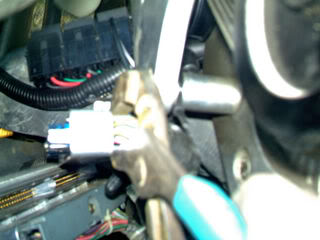
Us as flat screw driver to pry this thing off be careful not to break the clips.

Now take the blue wire from the wiring harness.
Insert this wire with some needle nose pliers (to avoid bending the wire) into pin 42 until you can clearly see the pin is all the way in through the blue connector like the rest that are already in (be sure it's completely in).
Pin 42 is the second holes on bottom from left to right just push wire through yellow pin cove.

Now just reinstall the plastic wire cove back on the connector. Take the reflashed pcm and but the connectors back on making sure not to over tighten the bolts and but the cover back on.
13 Mounting fans
I removed the plastic cover over the radiator. Drilled two small holes one on each of the tabs of the ls1 fan. Then I drill two more on top of my radiator support. The holes aligned with the holes on the fan. Then I simply put a zip tie in each hole to hold the fans.
I also drilled one more hold for the pin that holds the radiator hose and inserted it there.
On bottom I drilled two more holes on fan one on each side and through the metal the radiator sits on making sure not to drill through the radiator or anything else. And two more zip ties go there.
Finally I take the two fan connectors and hook them up to the fans. And mount the relays to the plastic pcm cover.
Then reinstall your plastic back on top of your radiator support.
So now you�re finished and if it�s another pcm you installed you�ll notice your truck does not start.( Hook your battery back up) and it still may not work so:
1 You�ll need to try to turn your truck on (notice it does not start do it once) and leave the key in the on position for 12 min or more.
2 The turn the key off for 45 seconds or more.
Do step 1 and 2 3 times and on the fourth time it should start right up.
1 efans off of a 98 vett.($120)
2 Wiring harness from nelson performance.($100? this seams like a mistake I'll
Call them)
3 PCM reflased to activate the LS1 fan.($65 by pcm for less because I
needed other things done but nelson offered to do it for 25 + shipping)
4 tools You'll need some pliers, needle nose pliers, zip ties, flat head screw driver, wire stripers,7mm socket,10mm socket,8mm socket, I used the dummy wrench, hammer, 12inch metal rode.
5 Step 1 remove fans shroud you have two 10 mm screws up top take those out. Then take plastic ring holding water hose off of the fan shroud by pulling it out. and on the right side you have another hose sitting on the shroud move it. and you have to plastic pins that hold your fan shroud to the bottom take those off and your top portion of the fan shroud should come right out.
6 Then you have two more 10mm screws one and each side of the bottom part of fan shroud remove those and turn the shroud clock wise and it should come right out be sure your hoses are out of the way
7 Now remove the fan to do this take a long socket extension and place it on the bolt that attaches the fan to the water pump pulley as shown below. Take the hammer and hit the extension to try to make the bolt com off counter clockwise. Once you knock it loose you should be able to take you had and turn the fan counter clock wise until it's off. Or you can uses a long wrench and hit it to do the same thing.
8 Now disconnect your battery to avoid burning anything up.
9. Take your wiring harness and get the two red cables and connect them to the red box by your alternator on driver�s side by opening the box. Remove the 17mm nut and place your two red wires there and put the nut back on. Close the box.
10 Now take your two black wires and remove a 10mm bolt that holds the red box. Place the screws threw the two black wire rings and tighten it down.
11. Now we'll install the AC fan 12V wire. There is a group of wires that runs up between the place you grounded and the red box. Take this and remove the loom so you can see the wires. I had 2 green wires the thicker of the two is the one you�re going to tap into.
So strip a little off of the green wire and tap the wiring harness green wire to it.
12 PCM install
On the drivers side you have your pcm covered by a black plastic near the radiator remove this cover. Should look like this after removed.
Pop the top clip with a flat screw driver to remove pcm to view the two 7mm bolts on back.
Remove those bolts until the pcm is completely disconnected. Then take the pliers and squeeze gently the blue connection on the back to access the wires.
Us as flat screw driver to pry this thing off be careful not to break the clips.
Now take the blue wire from the wiring harness.
Insert this wire with some needle nose pliers (to avoid bending the wire) into pin 42 until you can clearly see the pin is all the way in through the blue connector like the rest that are already in (be sure it's completely in).
Pin 42 is the second holes on bottom from left to right just push wire through yellow pin cove.
Now just reinstall the plastic wire cove back on the connector. Take the reflashed pcm and but the connectors back on making sure not to over tighten the bolts and but the cover back on.
13 Mounting fans
I removed the plastic cover over the radiator. Drilled two small holes one on each of the tabs of the ls1 fan. Then I drill two more on top of my radiator support. The holes aligned with the holes on the fan. Then I simply put a zip tie in each hole to hold the fans.
I also drilled one more hold for the pin that holds the radiator hose and inserted it there.
On bottom I drilled two more holes on fan one on each side and through the metal the radiator sits on making sure not to drill through the radiator or anything else. And two more zip ties go there.
Finally I take the two fan connectors and hook them up to the fans. And mount the relays to the plastic pcm cover.
Then reinstall your plastic back on top of your radiator support.
So now you�re finished and if it�s another pcm you installed you�ll notice your truck does not start.( Hook your battery back up) and it still may not work so:
1 You�ll need to try to turn your truck on (notice it does not start do it once) and leave the key in the on position for 12 min or more.
2 The turn the key off for 45 seconds or more.
Do step 1 and 2 3 times and on the fourth time it should start right up.
Last edited by NegraRCSB2X4auto; 12-19-2006 at 01:15 PM. Reason: updating
 08-20-2007, 05:29 AM
#17
TECH Enthusiast

Join Date: Dec 2003
Location: Western WA
Posts: 572
Likes: 0
Received 0 Likes
on
0 Posts
Blue Loctite is very useful for keeping bolts from working loose, BUT only a single small drop is needed. Completely coating the threads with the stuff will make removing the bolt like arm-wrestling a gorilla.

 11-16-2007, 11:19 PM
#20
Teching In

Join Date: Nov 2007
Location: Missouri
Posts: 13
Likes: 0
Received 0 Likes
on
0 Posts
I've a tip to add to the last post I use it every time I put a pump into a Chevy/Gmc pickup. Take the bed loose, with the bed removed the tank is still bolted to the frame rail with the pump module rght on top. Al you need is a couple of buddies to help with the lifting te bed, remove 6 bolts (bolts holding bed down) taillight harness connector, 2 grounds and unbolt the filler neck @ the body. It cuts alot of time off the job and no dropping a half full (sloshy) tank. Hope this helps

Thread
Thread Starter
Forum
Replies
Last Post