2000 Chevy Silverado project "Charlie Murphy"
 07-05-2016, 02:57 AM
#521

Took a wire wheel to my turbo exhaust parts.


Next I cleaned the surfaces with brake cleaner then grease remover. Then I sprayed VHT Flame Proof Primer.
I put on a light coat, waited 15 minutes then put on a second light coat followed by a heavier coat. Pretty much what the instructions said.

Same process for the Flameproof black. 2 light coats and a medium coat.

Ideally I'd bake these, following what the instructions say. Cycling between different temperatures. Unfortunately I don't have an oven large enough. I've always wanted to build a medium sized powdercoat oven, but don't really have the place to put it.
Next I'll wrap the parts. I'll do my best to heat cycle them when I install the turbo stuff.

 07-06-2016, 04:07 AM
#523
Thanks for the tip Atomic! I'll make sure I start it up outside of the garage the first time. The instructions say to heat cycle 3 times. I'll do my best to do so.
Now that my flares are off I washed my truck and took a clay bar to it. Next, I set out to cut and buff to see if I could get rid of the tape lines both from the flares as well as from the side moldings.

Since this is the first time I've ever done something like this, and this is a black truck, I feel I've been a bit reserved. Still, I made some progress.

Unfortunately, there's nothing that's going to fix 16 years of rock chips and whatnot. Im still planning on another round of cutting with the wool pad. These pics are prior to and buffing using the foam pad and swirl remover.
Behind the front fender.

Passenger door.

In front of rear tire.

The gouge in the paint from the fender flare.

Behind the rear fender flare. See the rock chip damage? How do I match that? LOL.

 07-10-2016, 04:42 AM
#525
Thanks!
I haven't measured since swapping the rear end but I need to make sure the pinion angle is correct. Any tips?


I cut. I buffed. I couldn't get all the marks out.

The damage from the flares is too deep to buff out.

It's much better than it was. I had only really intended on getting rid of the tape lines from the side trim and whatnot. I went ahead and cut/buffed the hood, front fenders, and everything from the side mirrors down.
I hate black.
There's rock chips and scratches all over the damn place. Looks better and okay from 20 feet I suppose. I need to get the tailgate panel welded in and then paint the tailgate.

It would have been helpful if the sun was out. I need to be able to properly assess the paint. I'll have to wait a week or so for the weather to cooperate.
Until then, check out these sweet action shots yo. LOL


I still need to work on roof. Anyone have experience with a paint pen? I'd like to fill in the rock chips maybe. I don't want to go crazy with it though, just protect the metal.
 07-19-2016, 11:03 PM
#527
Summer classes started, so I've been low on truck time. Any who, I tore into the stereo.

One of my amplifiers is malfunctioning so I decided to install one that I never installed in my Tahoe. The problem is, to run it in 2 way I need to bridge 2 channels into 1, for both left and right. Luckily, I'm in the business of making custom RCA cables. LOL. It just takes forever.

Here's what I ended up with.

I actually have some different speakers I'd like to try, but my patience for stereo fabrication is running short. There's still a lot of stereo tuning to be done since I changed stuff up. Another time though.
Everything's working again.

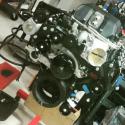
Wrapped the turbo manifold and downpipe.

I have a question. I got to looking at the turbo and the supply side and drain side are flipped. I don't want to supply from underneath right? I've never seen a setup like that. It got me thinking though. Why not? The turbo would always be full of oil that way. Would the oil boil? What would happen if you were to supply oil from underneath?

So, I can just unbolt these bolts and turn the turbo exhaust around correct?

If so, what do I torque them to?

One of my amplifiers is malfunctioning so I decided to install one that I never installed in my Tahoe. The problem is, to run it in 2 way I need to bridge 2 channels into 1, for both left and right. Luckily, I'm in the business of making custom RCA cables. LOL. It just takes forever.

Here's what I ended up with.

I actually have some different speakers I'd like to try, but my patience for stereo fabrication is running short. There's still a lot of stereo tuning to be done since I changed stuff up. Another time though.
Everything's working again.

Wrapped the turbo manifold and downpipe.

I have a question. I got to looking at the turbo and the supply side and drain side are flipped. I don't want to supply from underneath right? I've never seen a setup like that. It got me thinking though. Why not? The turbo would always be full of oil that way. Would the oil boil? What would happen if you were to supply oil from underneath?

So, I can just unbolt these bolts and turn the turbo exhaust around correct?

If so, what do I torque them to?