

97 silverado rcsb street truck
 03-11-2015 | 10:21 AM
#1

Thread Starter
Staging Lane
Joined: Apr 2012
Posts: 88
Likes: 0
From: Calgary, Alberta
Hey everyone! I'm a long time lurker, and I am transferring my build onto here. I've owned a few gm trucks in the past few years between some of the car projects. My first was actually an oobs 1 ton crew cab long box that I shortened to a short bed, dropped it, and did a 5 bolt conversion. I had good intentions for it, but ended up selling as a project that you see here.

Next was a sort of 454ss tribute which i should have kept

After that I had a ecsb that was more of just a driver/ parts runner

That brings us to this fall. I really wanted another rcsb to make into a toy. After searching for most of the summer, I found one 3 hours away, and it fit the bill perfect; blown 4.3/auto, 200k, maroon interior, drop shackles, 454ss wheels. It was a little beat here and there, the interior is a little dumpy, but it was cheap!

My short list of ever changing plans;
-4/6 or 5/7 drop,
-Yank the 4.3/4l60e in favor for a carb'd 350/700r4...recycled from another project it just sold...this will open a whole can of worms/mods to accommodate,
-Going for sort of a sleeper look, so keeping it subtle.
My first purchase was a set of bfg's, 275/60's for the rear, and 235/70's for the front so i have an even 28" tire all around. Then I ditched the LMC grille, in favor for stock chevy I had laying around with black bowtie. Its not in the best shape, but it way better than the LMC thing.

To date I have the drivetrain pulled, and front suspension, and im cleaning and painting, to get ready to install the new power plant. Its a 350 vortec with edelrock 2099 top end package

Im also ditching abs, a/c, and everything else under the hood that isn't absolutely needed. Wiring is going to be the next major hurdle very soon. The harness is almost out of the truck. I am pulling the dash and taking out whats left of the harness inside so i can lay it out, and thin it down.
Another side projects thats happening; Originally I was going to have the ss wheels widened, but it turned out to be a pain in the ***. So im going to dress it down with factory steel wheels, painted black, with no beauty ring, and just stock centers. I ordered 15x10 stock looking rears from wheel vintiques with 6" bs, which should arrive by Feb next year. I found a pic of another obs for inspiration, and did a ms paint chop of what it should look like. Kudos to the owner (the original pic of the white truck is an extended cab with stock steel's all around)


Couple more of a smoothie steel wheel to get the idea.
03-11-2015 | 10:23 AM
#2
Thread Starter
Staging Lane
Joined: Apr 2012
Posts: 88
Likes: 0
From: Calgary, Alberta
I got a little bit of work done before Christmas...mostly just catching up on pictures so I can keep things in order. I did finish getting the engine harness out of the truck now. Also I pulled the dash out. That sort of happened because I couldn't tell where the hvac harness connections were hiding. In hind sight, the dash could have stayed, but it is a cracked to hell, so its not all bad. I will take advantage of this and fill the a/c holes too. Im going to practice on this dash on the new gauge arrangement also. For what I have in mind, I think there will be some cutting involved, and maybe some heat duct re-work.

Here it is on its way out. The bench and a bunch of plastic has made its way out already.

Jumbled mess...man I hate wiring.

Getting pretty bare inside. Going to look for next; tilt column, split bench with folding center console, and possibly power windows. Next trip to pick-n-pull with hopefully yield some grey interior

Anyone need red/maroon parts...lol

Super sweet duck tape window mod....Not sure what the slider is missing just yet, but it made me laugh

Down to pretty much bare bones up front. It won't be long before its ready for the new sbc.
 03-11-2015 | 10:29 AM
#4
Thread Starter
Staging Lane
Joined: Apr 2012
Posts: 88
Likes: 0
From: Calgary, Alberta
Pretty excited about some interior stuff I got going on. Was surfing some local adds, and landed a set of ultra lite 2 gauges for the truck, with all the sending units. The speedo and tach are 3-3/8" and the rest are 2". I got lucky and managed to keep the stock bezel, and pretty much just gutted the back plastic half, then I made a new gauge plate out of aluminum.


I trimmed up the dash, and get the gauge panel to sit as it should to see how it looks with the bezel back on. It doesn't seem like it will interfere with the heat duct.


Last piece of the puzzle, as the gauges didn't come with a matching volts gauge. Also picked up some pilot lights for signals, and high beam, and painted the panel black.

To wire the gauges, my plan is to splice the factory cluster harness for illumination, left and right signals, high beam, and ground. Then run the other output wiring through a new firewall grommet to the sending devices. As for the speedo, Im thinking I will end up getting a gps unit
Also some other small updates, the wiring harness is pretty much stripped down to bare minimum, and I stripped the air bag out of the pass side of the dash, and its associated wiring. I will just fasten the cover to the dash so it still looks normal. Will post some more pics soon.
03-11-2015 | 10:32 AM
#5
Thread Starter
Staging Lane
Joined: Apr 2012
Posts: 88
Likes: 0
From: Calgary, Alberta
I finished stripping the frame, and cleaning up everything good enough for a coat of paint. I used rustoleum semi gloss black. It turned out pretty decent, and now I can start catching up on assembling stuff back on the truck. My Belltech stuff arrived also, so when I put the front suspension back together with the new 3" drop springs, i also tossed in new ball joints, rotors, calipers, bearings. This was prior to purchasing drop spindles, so there will be an update about that. All the steering components have been replaced already with moog equipment so that was a bonus. Its on wheels and sitting back on all fours again...just don't have good pics yet in the day light, and it sits like a 4x4 with no weight in it. I just need to get correct length shocks. I also started mocking up my used griffin rad (originally for a 70-81 f-body), and although the 4 core fits a little tight against the rad support, and fills the bottom channel a little snug, it works. I just ended up cutting some mild steel for the upper hold down that I will also use to make mounting tabs for an e-fan. Here are a couple pics of how its starting to look. More pics coming soon.


 03-11-2015 | 10:39 AM
#6
Thread Starter
Staging Lane
Joined: Apr 2012
Posts: 88
Likes: 0
From: Calgary, Alberta
Hit a milestone...got two projects completed in one day, haha. Me and the boy finished up some work on his buggy, and went burning around in the snow. It used to be a Jeep Hurricane Power Wheels. Now it sits on a Polaris Mojave quad chassis with a 5hp Kohler and a rock crawler looking exo cage. It needs more gear/less tire yet.

Then I got the engine/tranny into the truck. Here she is switched over from the running stand, ready to mate up.

First I had to finish up a few things on the 700r4; I got the wiring done for single wire 4rth gear lockup, and tossed in a new filter, and the 4.3L convertor, and mated it to the 350. I've never wired up an overdrive like this, but after doing some searching it seems pretty simple. The way its wired requires just a single 12v feed to port "A" of the harness plug. That wire runs to a normally open pressure switch in the 4rth gear pressure port, then from there over to the tcc solenoid. It needs a couple other things on the truck like a brake switch, and vacuum switch besides the positive feed to operate.
Edit***decided on changing the way this is wired again, and will just be running switched lockup from the cab**** I'm positive the 700r4 won't survive behind the motor anyways. I've got a th400 that may go in soon after.

I finally got it in at the end of the night. I've got some small issues to tend to, like the engine side mounts I had laying around won't line up to the frame side mounts...not sure whats up there just yet. ***EDIT*** the rubber inserts of the frame side mounts just needed to slide up inside the shell, and the engine dropped down and bolted up. I've never ran into that before. I guess I'm lucky that this is only the first time installing new mounts that I have not encountered this before.

I slid these headers in too. I picked them up used for a steal. They are just el cheapo headman long tubes. The other hooker super comp headers I had from from my last project A-body were nice, but there was no way they were going to work so I sold them off. I was pretty surprised that they just went in from the top with no fighting or anything. Usually with long tubes I've ever installed, one goes in from the top, and one from the bottom, or something ends up being a major pain in the ***. Ground clearance is great too, and they are tucked up above the frame. They are in major need of clean and paint, or coating though


At least now I can work on getting the high flow y-pipe, and the rest of the exhaust back on the truck. I would have tried to do duals, but since it was all nice magnaflow stuff, and it y's into 3" nicely.
If I get to go really crazy, I was thinking its a good start for a single remote mount turbo. The engine doesn't have that much compression, and the holley is set up for blow thru already. Very wishful thinking at this point. After building a junkyard turbo mustang, it will be hard not to resist boost again.

Last edited by lsxponcho; 03-11-2015 at 11:03 AM.
03-11-2015 | 10:45 AM
#7
Thread Starter
Staging Lane
Joined: Apr 2012
Posts: 88
Likes: 0
From: Calgary, Alberta
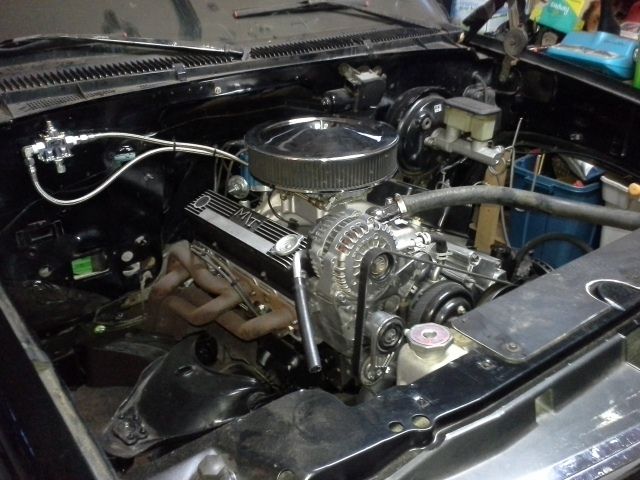
Another thing to check off the list...Accessories are cleaned, and finished chopping up. The alt bracket is basically unaltered, save for removing the idler pulley. I was going to switch it with a ribbed pulley because I was woried that if I ran the belt straight from the alt to the power steering pump that it would be too close to the water pump. After everything was mocked up, it turns out there is plenty of clearance, so I ditched the idler. One other small thing to note: if I would have ran the idler, there would not have been much alternator engagement, and might have caused slipping. Now that Im certain its not needed, I may trim off the mounting boss from the bracket to clean it up just a little more.
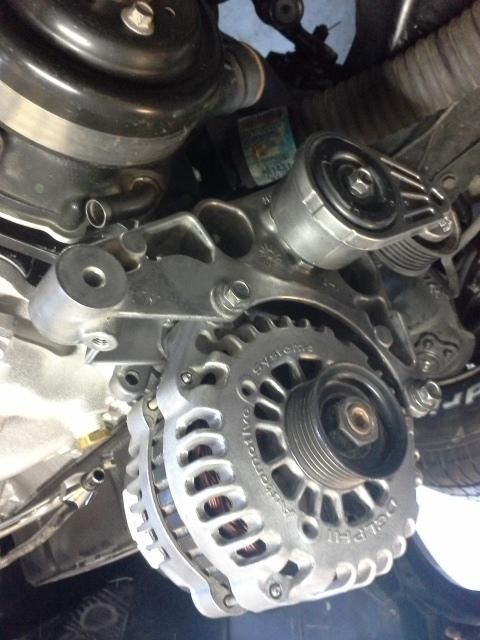
The power steering bracket turned out well. I did oops on one spot while cutting the top portion of the bracket for the a/c pump (you can see the partial cut mark on the lower mounting hole by the water pump where I cut in a little more than I intended too). Other than that I rounded some corners and roughly polished it up a little. Now it doesn't seem like the accessories block the view from the engine so much.

After its all said and done I cut the stock belt down and with some handy dandy zip ties, I ended up with an 85" belt. I orded a new one today, so there's another thing to cross off the list.


On a side note, don't you hate when your working in sort of a mess of stuff, but you are in too much of a hurry to make sure you don't knock things over while your working. I was trying to multi task while doing the accessories, and decided to land the distributor for some reason. So I set the cap on the rad support right next to me, and sure enough while rolling the engine over to tdc, I kocked the cap off, and it broke on the ground Guess I will need another new cap...dammit!

The power steering bracket turned out well. I did oops on one spot while cutting the top portion of the bracket for the a/c pump (you can see the partial cut mark on the lower mounting hole by the water pump where I cut in a little more than I intended too). Other than that I rounded some corners and roughly polished it up a little. Now it doesn't seem like the accessories block the view from the engine so much.

After its all said and done I cut the stock belt down and with some handy dandy zip ties, I ended up with an 85" belt. I orded a new one today, so there's another thing to cross off the list.


On a side note, don't you hate when your working in sort of a mess of stuff, but you are in too much of a hurry to make sure you don't knock things over while your working. I was trying to multi task while doing the accessories, and decided to land the distributor for some reason. So I set the cap on the rad support right next to me, and sure enough while rolling the engine over to tdc, I kocked the cap off, and it broke on the ground
Guess I will need another new cap...dammit!
Trending Topics
03-11-2015 | 10:49 AM
#8
Thread Starter
Staging Lane
Joined: Apr 2012
Posts: 88
Likes: 0
From: Calgary, Alberta
Started playing with the regulator mounting and carb feed lines. The inner fenders aren't in yet, so out of curiosity I tried using one of the coolant overflow tank mounting holes to hang the regulator. With the length of the braided lines, it works pretty decent. I may leave it like this, since it would be easy to tube down, and out the back for the rest of the fuel line. The only problem is the lip of the cowl would make it hard to get an allen key into the regulator, but I could clearance just that spot, and you wouldn't really notice. Also would still have to put a tee in to run a fuel pressure gauge. Im pretty sure the fpr can't be mounted on the firewall if I wanted the truck to pass tech at a track. Since its mostly a street toy, and I don't have a track close, I am not to worried about it as long as it doesn't look funny once everything is back under the hood.


 03-11-2015 | 10:56 AM
#9
Thread Starter
Staging Lane
Joined: Apr 2012
Posts: 88
Likes: 0
From: Calgary, Alberta
I sold the 454ss rims/tires the other day (and made a small profit for once). I heard back from the Wheel Vintiques finally. They did not do a custom backspace run in January or February for some reason (maybe not enough orders ?), so they started building them last week. They should be done, and in Calgary in roughly 2 weeks. I changed around to a drag radial this time, and went with et street radial 28x11.5. I will either be going 235/70/15 in the front again, or maybe 225/70/15 for a slightly shorter tire depending on how the truck will sit when its together again. So since spring weather is rolling around, it was time to kick some ***...and take the *** end apart haha. The exhaust and rear end are out of the truck prepping for the axle flip. I built some plates, drilled offset holes in the perches i had, and I will be mocking it up in the next couple of nights to set pinion angle, and weld her up. I also picked up some Earls/Russel fittings for the tank so I can get the fuel system happening. I'm building a small rear mounted sump, and will run the fuel supply to the Holley blue pump mounted just behind the tank, then 3/8 stainless line (no return) up to the regulator where its shown in the pic previously. While tearing down I snapped an action shot. More progress soon!

 03-11-2015 | 10:10 PM
#10
Teching In
Joined: Apr 2013
Posts: 34
Likes: 1
From: Clermont, FL
Awesome build. I am building something very similar. If you don't mind how much did the custom backspace rims cost you? I've been interested in getting a set of stock looking rims in the same sizing as you did for just slicks