
My Trailblazer SS (Infinitely On-Going) Build
 07-26-2011, 05:13 PM
#1
Staging Lane
Thread Starter

Join Date: Jul 2008
Location: Reno, NV
Posts: 79
Likes: 0
Received 0 Likes
on
0 Posts
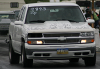
Some of you guys over here know me, but for the most part, I haven't really introduced myself...
My 2006 AWD Trailblazer SS has been an on-going project for the better part of the last 3(ish) years. It all started when we decided to slap a Procharger on the truck. We upgraded to the Extreme Valvetrain kit and threw a Comp cam in the truck and ran it at 10psi with Meth, FLT Level 7 trans, Yank PTB3600, Kooks 1 7/8" headers, dual 3" Magnaflow exhaust, Siemens Deka Injectors, etc.
We knew we wanted to future-proof the fuel system, so we took a set of Silverado SS rails and made a custom cross over pipe out of stainless to convert the fuel system to a -8AN feed/-6AN return (stock was returnless). With a single Bosch 044 in the stock bucket and another sumped into the rear of the tank set on a Hobbs switch, we knew we had enough fuel for whatever I wanted to EVER do to the truck.
Here is the intake manifold all wrapped up with the Silverado SS rails and FPR with my custom crossover pipe.
NewCrossoverTube.jpg?t=1311797901
It worked very well for awhile, but the FPR got very erratic over time and wouldn't hold a consistent fuel pressure, so we now run 3/4" ID billet rails with an Aeromotive A1000 -10an boost referenced FPR and a -10an feed/-6an return.
More pics of fuel system.

DualBoschPumpCheckValves.jpg?t=1311797445
After all the essentials, we got down to it with plumbing a custom intake/intercooler system based around the House of Boost Procharger bracket.
4" Intake with filter in waterproof bag mounted behind passenger side brake duct.
4InchIntakeTube4.jpg?t=1311797550
3" pre-intercooler pipe where the Vortech Maxflow Race BPV is mounted.
PreIntercoolerTurndown2.jpg?t=1311797623
Intercooler is laid up under the front bumper and I have had no problems with anything hitting it or anything! It works great!
IntercoolerFromFrontGround2.jpg?t=1311797779
Finished product...or so we thought!

Soon after we got it done, we realized the stock 6-rib system was causing too much belt slip, so I went with an ATI 8-rib conversion (full size truck conversion kit) and made the necessary modifications to the P.S. pulley to work with my system and went to the track!
http://www.youtube.com/watch?v=k7LKrAHW9PQ
Our famous donut video...
http://www.youtube.com/watch?v=JOvG_2Y-aN8
My 2006 AWD Trailblazer SS has been an on-going project for the better part of the last 3(ish) years. It all started when we decided to slap a Procharger on the truck. We upgraded to the Extreme Valvetrain kit and threw a Comp cam in the truck and ran it at 10psi with Meth, FLT Level 7 trans, Yank PTB3600, Kooks 1 7/8" headers, dual 3" Magnaflow exhaust, Siemens Deka Injectors, etc.
We knew we wanted to future-proof the fuel system, so we took a set of Silverado SS rails and made a custom cross over pipe out of stainless to convert the fuel system to a -8AN feed/-6AN return (stock was returnless). With a single Bosch 044 in the stock bucket and another sumped into the rear of the tank set on a Hobbs switch, we knew we had enough fuel for whatever I wanted to EVER do to the truck.
Here is the intake manifold all wrapped up with the Silverado SS rails and FPR with my custom crossover pipe.
NewCrossoverTube.jpg?t=1311797901
It worked very well for awhile, but the FPR got very erratic over time and wouldn't hold a consistent fuel pressure, so we now run 3/4" ID billet rails with an Aeromotive A1000 -10an boost referenced FPR and a -10an feed/-6an return.
More pics of fuel system.
DualBoschPumpCheckValves.jpg?t=1311797445
After all the essentials, we got down to it with plumbing a custom intake/intercooler system based around the House of Boost Procharger bracket.
4" Intake with filter in waterproof bag mounted behind passenger side brake duct.
4InchIntakeTube4.jpg?t=1311797550
3" pre-intercooler pipe where the Vortech Maxflow Race BPV is mounted.
PreIntercoolerTurndown2.jpg?t=1311797623
Intercooler is laid up under the front bumper and I have had no problems with anything hitting it or anything! It works great!
IntercoolerFromFrontGround2.jpg?t=1311797779
Finished product...or so we thought!
Soon after we got it done, we realized the stock 6-rib system was causing too much belt slip, so I went with an ATI 8-rib conversion (full size truck conversion kit) and made the necessary modifications to the P.S. pulley to work with my system and went to the track!
http://www.youtube.com/watch?v=k7LKrAHW9PQ
Our famous donut video...
http://www.youtube.com/watch?v=JOvG_2Y-aN8
Last edited by Evil SS 2006; 07-27-2011 at 03:24 PM.
 07-26-2011, 05:30 PM
#2
Staging Lane
Thread Starter
Join Date: Jul 2008
Location: Reno, NV
Posts: 79
Likes: 0
Received 0 Likes
on
0 Posts
After running consistent 11.50's @120mph and nearly 8,000miles on the Procharger, this happened...

So I pulled the engine and started acquiring parts. I decided that I was going to put only the most bullet-proof parts into the new motor, so I chose Wiseco X Series Pistons (-11cc), Callies Compstar Hybrid H/I rods, Calico coated Clevite H Series main and rod bearings, Calico coated Durabond cam bearings, polished stock crank, Ferrea 6000 intake valves, Inconel exhaust valves, Bronze guides, decked head surface, stock portings, stock chambers, blueprinted Melling high volume oil pump, LS7 lifters, Comp Hi-tek pushrods, Comp Trunion upgrade to stock rockers, etc. etc.


Since the engine was out and I had plenty of time, we decided to finish up a few loose ends including filling the hole I had to cut in the inner fender, which was done to make room for the full 4" intake.

We also cleaned up the entire engine bay, repainted a lot of stuff and then focused on brakes and suspension...
Pulled the rear axle, cleaned it up and prepped it for the suspension work.


Leftcoast '32 4130 tubular engine cross member

Modded DJM Upper A-arms

Belltech/KW Variant 3 Coilovers and rear spring conversion


And to finish off the underside, Baer Pro+ 6-piston 4-corner brake system with my own brand of braided stainless brake lines

So I pulled the engine and started acquiring parts. I decided that I was going to put only the most bullet-proof parts into the new motor, so I chose Wiseco X Series Pistons (-11cc), Callies Compstar Hybrid H/I rods, Calico coated Clevite H Series main and rod bearings, Calico coated Durabond cam bearings, polished stock crank, Ferrea 6000 intake valves, Inconel exhaust valves, Bronze guides, decked head surface, stock portings, stock chambers, blueprinted Melling high volume oil pump, LS7 lifters, Comp Hi-tek pushrods, Comp Trunion upgrade to stock rockers, etc. etc.
Since the engine was out and I had plenty of time, we decided to finish up a few loose ends including filling the hole I had to cut in the inner fender, which was done to make room for the full 4" intake.
We also cleaned up the entire engine bay, repainted a lot of stuff and then focused on brakes and suspension...
Pulled the rear axle, cleaned it up and prepped it for the suspension work.
Leftcoast '32 4130 tubular engine cross member
Modded DJM Upper A-arms
Belltech/KW Variant 3 Coilovers and rear spring conversion
And to finish off the underside, Baer Pro+ 6-piston 4-corner brake system with my own brand of braided stainless brake lines
Last edited by Evil SS 2006; 07-26-2011 at 09:27 PM.
07-26-2011, 05:35 PM
#3
Staging Lane
Thread Starter
Join Date: Jul 2008
Location: Reno, NV
Posts: 79
Likes: 0
Received 0 Likes
on
0 Posts
Next thing on the list was to design and fabricate my own custom fully adjustable race control arms to keep the rear end planted and stable! I decided that nothing currently available from Spohn or BMR was "worth the money" so I figured if I was going to spend $600.00+, I might as well make my own arms! They are a combination of 4130 with a poly bushing on the frame mount side with a solid 1.75" OD 6061-T6 billet center section and a PTFE lined 4130 FK JMX rod end on the axle mount side.


Installed Photos


Installed Photos
07-26-2011, 05:42 PM
#4
Staging Lane
Thread Starter
Join Date: Jul 2008
Location: Reno, NV
Posts: 79
Likes: 0
Received 0 Likes
on
0 Posts
Add to that my carbon fiber cowl hood, and the truck is finally coming together for the 2011 show season, SEMA in November and the Motor Trend International Auto Show in Las Vegas at the end of November


 07-26-2011, 06:01 PM
#6
Staging Lane
Thread Starter
Join Date: Jul 2008
Location: Reno, NV
Posts: 79
Likes: 0
Received 0 Likes
on
0 Posts
I am leaving out a ton of details about the truck and modifications we have made, but I want to give a shout out to a few people on here who I couldn't have done a lot of this work without!
First - Aaron, you guys know him as MFIC, he is my friend, tuner, and general cohort in this addiction and he has helped fabricate, install, modify and so on with a lot of the items on this project!
Second - Dusty, Wilde Racing on here, a great help, he sat and supervised while I assembled the engine. He made sure I did everything right...or at least right enough...to get the thing together and out of his garage. He hooked me up with Clegg's Automotive in Utah for all the machine work as well!
The truck has been apart more times that it has been together, but always with just cause! We are currently re-doing the radiator hoses as I hate the flexible univeral one I had to run prior. We are actually making custom hard aluminum pipe hoses with hi-temp silicone couplers and t-bolt clamps for both upper and lower hoses right now.
We just finished with some issues we had with the water pump pulley...this wasn't good!

So we got a new pump, welded the pulley to the shaft, and sleeved the formerly threaded shank (we machined off the threads) with a hand machined piece of DOM and welded it at the base and the tip...teach that pulley to break!

I can literally go on and on and most of you already know, this stuff never ends, but I won't bore you with all the details! If you have any questions or comments, go right ahead and post!
Thanks for reading!
First - Aaron, you guys know him as MFIC, he is my friend, tuner, and general cohort in this addiction and he has helped fabricate, install, modify and so on with a lot of the items on this project!
Second - Dusty, Wilde Racing on here, a great help, he sat and supervised while I assembled the engine. He made sure I did everything right...or at least right enough...to get the thing together and out of his garage. He hooked me up with Clegg's Automotive in Utah for all the machine work as well!
The truck has been apart more times that it has been together, but always with just cause! We are currently re-doing the radiator hoses as I hate the flexible univeral one I had to run prior. We are actually making custom hard aluminum pipe hoses with hi-temp silicone couplers and t-bolt clamps for both upper and lower hoses right now.
We just finished with some issues we had with the water pump pulley...this wasn't good!
So we got a new pump, welded the pulley to the shaft, and sleeved the formerly threaded shank (we machined off the threads) with a hand machined piece of DOM and welded it at the base and the tip...teach that pulley to break!
I can literally go on and on and most of you already know, this stuff never ends, but I won't bore you with all the details! If you have any questions or comments, go right ahead and post!
Thanks for reading!
 You got some sick **** Steven
Trending Topics

 07-26-2011, 09:23 PM
#10
Staging Lane
Thread Starter
Join Date: Jul 2008
Location: Reno, NV
Posts: 79
Likes: 0
Received 0 Likes
on
0 Posts
This was back on the stock motor, cam only with the D-1SC at 10psi. I pulled up to a 3 lane wide red light. In the left lane is a Ferrari F430 Scudderia, middle lane is a Bentley Continental GTC (Both 40 something douche bags that have more money than brains). The Ferrari guy had his wife with him. Well, they were both revving on eachother like a couple 16 year olds in their Hondas. The light gets ready to change so I threw off Stabilitrak and waited. The Ferrari got up on his 2-step rev limiter and when the light turned, I blew off all four and was gone! It was like they weren't even trying...but they were!
When I let out at 120, it took 6-7 seconds for them to catch me. The wife of Ferrari guy was rolling in laughter giving me the thumbs up as the now angry husband passed in disbelief that a Trailblazer just ate him like a wild dog eating a possum's ***!
--------------
Last edited by Evil SS 2006; 07-27-2011 at 04:59 PM.