
SBC freshen up
 10-01-2013, 11:42 AM
#1
Launching!
Thread Starter

Join Date: Jun 2008
Location: Arizona
Posts: 286
Likes: 0
Received 0 Likes
on
0 Posts
Hey Guys, here are a few pics of my currently in progress project.
The SBC in my GMT800 had developed a few issues. When I assembled the engine I iuncorrectly used a stock length pushrod, It wore out the valve guides and mangled the stem tips. This problem, compounded with valve to piston interference during valve float in the high RPM has made for a set of wore out heads in 40k miles. The vale stem seals wouldn't even stay pressed on the guides, they would ride the valve stem and it would burn large amounts of oil.
In the pic, you can see the extreme sidways roll of the rocker arm has begun to saw through the stud.

A leaking transmission pump to converter seal, as well as a conveniently timed selling of my commuter car, prompted me to get working on my street machine. 9 times out of 10 when the converter seal blows fluid the pump bushing is gone too. Since a few years ago this pump had a shattered vane in it once, I opt'd to replace the pump unit itself. First I wanted to adress the motor.


The previous heads were budget Patriot 'Vortec' iron 185cc/64cc heads. Something always felt a bit off with them. The intake valve seat was outside of the chamber and the intake valve edge hung lower then the head surface. They had great street performance though, but felt weak in the high rpm. I was surprised to see evidence of valve float with the use of the COMP 26918 beehive springs with a XR276HR-10 & 1.5ers.
The replacement heads are also budget castings, Procomp aluminum 210cc/58cc angle plug. I decided on these heads because I wanted to try a few internet mods I've been reading about and I felt it better to bugger up a set of budgets rather the AFR 190's I've had my eye on. I've read the reviews, I read the problems associated with them. I've also read the praise and had friends that use these heads and are quite happy with them. One guy even said he picked up 3/10th's in the quarter compared to his vortec heads. I'm sure other variables played a role.
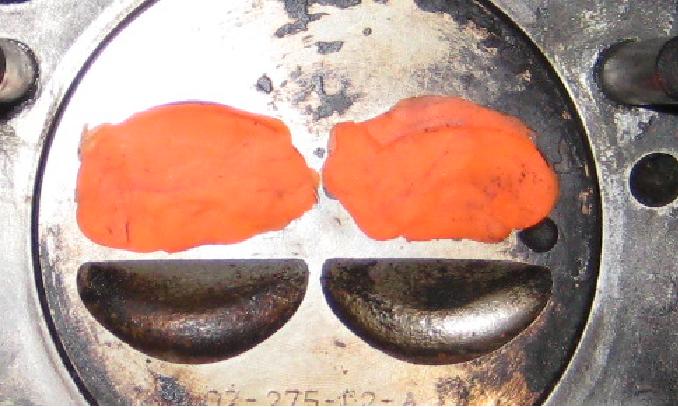
I installed the ARP studs, laid some play dough in the valve reliefs. Set the heads on without a gasket. Took an old lifter & gutted it and made a "solid" lifter. Then mounted my new 1.7 rockers. Turned the engine over a couple of times, did the intake then the exhaust. The valves just barely made an impression in the play dough:

Then got onto the cylinder head mods. Singh Grooves, chamber dimpling and mild Powre Lynz:


Bolted and torqued the heads down, installed the new RPM air-gap,

Dug out the pushrod length tool and began to find a decent wear pattern. It looks like 7.350" will get me in the ball park.


Installed a higher capacity oil pan with a sump trap door and a new pickup tube.

Cleaned up and painted the headers, checked the angle plug to header tube clearance. Cyl #3 will be tight, may even rub. I plan to run the wires under the headers and up the back of the heads. I did this previously with a set of premade Taylors and I burned a wire. This time I'll have the do-it-yourself MSD kit and make sure there is ample clearance.

And there the engine will sit in front of my horse cart while I await the arrival of pushrods.
The piston sits .004" in the cylinder, .026" HG, 61ish chambers will equal out to an even 11:1 static compression with .032 quench. With the XR276hr and my 5400ft elevation the DCR will be around 7.76:1 and 91 pump friendly.

Now to begin the transmission side of things.
The trans is a PerformaBuilt level 2 4L60E, that I blew up. Several years ago I shattered the pump drive/vane. I replaced just the vane in the original housing and drove it for another year. Then the entire transmission siezed and I had a trusted local builder rebuild the performabuilt unit, this time installing a Transgo HD3 & 46mod full manual kit. I've got about 3 years use out of the trans after being rebuilt and it's still going fine. Now that the front pump is leaking. I opted to replace the pump unit entirely, this time dialing in the 46mod modulator for better high manifold vacuum pressure.
While the engine was out I wanted to do a compartment clean up. Degrease the fire wall and fenders and sprayed with a satin black. Also cut back and removed any wiring and harnesses no longer in use, before the wiring harness draped over the engine, this time I want everything tucked up and away.

Pics of that job will be up soon. Cheers ~Mykk
The SBC in my GMT800 had developed a few issues. When I assembled the engine I iuncorrectly used a stock length pushrod, It wore out the valve guides and mangled the stem tips. This problem, compounded with valve to piston interference during valve float in the high RPM has made for a set of wore out heads in 40k miles. The vale stem seals wouldn't even stay pressed on the guides, they would ride the valve stem and it would burn large amounts of oil.
In the pic, you can see the extreme sidways roll of the rocker arm has begun to saw through the stud.

A leaking transmission pump to converter seal, as well as a conveniently timed selling of my commuter car, prompted me to get working on my street machine. 9 times out of 10 when the converter seal blows fluid the pump bushing is gone too. Since a few years ago this pump had a shattered vane in it once, I opt'd to replace the pump unit itself. First I wanted to adress the motor.


The previous heads were budget Patriot 'Vortec' iron 185cc/64cc heads. Something always felt a bit off with them. The intake valve seat was outside of the chamber and the intake valve edge hung lower then the head surface. They had great street performance though, but felt weak in the high rpm. I was surprised to see evidence of valve float with the use of the COMP 26918 beehive springs with a XR276HR-10 & 1.5ers.
The replacement heads are also budget castings, Procomp aluminum 210cc/58cc angle plug. I decided on these heads because I wanted to try a few internet mods I've been reading about and I felt it better to bugger up a set of budgets rather the AFR 190's I've had my eye on. I've read the reviews, I read the problems associated with them. I've also read the praise and had friends that use these heads and are quite happy with them. One guy even said he picked up 3/10th's in the quarter compared to his vortec heads. I'm sure other variables played a role.
I installed the ARP studs, laid some play dough in the valve reliefs. Set the heads on without a gasket. Took an old lifter & gutted it and made a "solid" lifter. Then mounted my new 1.7 rockers. Turned the engine over a couple of times, did the intake then the exhaust. The valves just barely made an impression in the play dough:


Then got onto the cylinder head mods. Singh Grooves, chamber dimpling and mild Powre Lynz:


Bolted and torqued the heads down, installed the new RPM air-gap,

Dug out the pushrod length tool and began to find a decent wear pattern. It looks like 7.350" will get me in the ball park.


Installed a higher capacity oil pan with a sump trap door and a new pickup tube.

Cleaned up and painted the headers, checked the angle plug to header tube clearance. Cyl #3 will be tight, may even rub. I plan to run the wires under the headers and up the back of the heads. I did this previously with a set of premade Taylors and I burned a wire. This time I'll have the do-it-yourself MSD kit and make sure there is ample clearance.

And there the engine will sit in front of my horse cart while I await the arrival of pushrods.
The piston sits .004" in the cylinder, .026" HG, 61ish chambers will equal out to an even 11:1 static compression with .032 quench. With the XR276hr and my 5400ft elevation the DCR will be around 7.76:1 and 91 pump friendly.

Now to begin the transmission side of things.
The trans is a PerformaBuilt level 2 4L60E, that I blew up. Several years ago I shattered the pump drive/vane. I replaced just the vane in the original housing and drove it for another year. Then the entire transmission siezed and I had a trusted local builder rebuild the performabuilt unit, this time installing a Transgo HD3 & 46mod full manual kit. I've got about 3 years use out of the trans after being rebuilt and it's still going fine. Now that the front pump is leaking. I opted to replace the pump unit entirely, this time dialing in the 46mod modulator for better high manifold vacuum pressure.
While the engine was out I wanted to do a compartment clean up. Degrease the fire wall and fenders and sprayed with a satin black. Also cut back and removed any wiring and harnesses no longer in use, before the wiring harness draped over the engine, this time I want everything tucked up and away.

Pics of that job will be up soon. Cheers ~Mykk
Last edited by 04SilveradoMykk; 10-01-2013 at 12:11 PM.
 10-01-2013, 02:24 PM
#2
Launching!
Thread Starter
Join Date: Jun 2008
Location: Arizona
Posts: 286
Likes: 0
Received 0 Likes
on
0 Posts
Test fit the trucks original V6 brackets & accessories. Looking for pulley alignment. So far it looks good. I'm really thankful things still line up with such a missmatch of parts & years. 2004 4.3L brackets, 86-95 block, 86 harmonic balancer, 89 water pump, aftermarket crank & WP pullies.


 10-01-2013, 10:27 PM
#4
Launching!
Thread Starter
Join Date: Jun 2008
Location: Arizona
Posts: 286
Likes: 0
Received 0 Likes
on
0 Posts
Yea exactly. Guys who have done the grooves say good things about it. Those who have not tried them hate the idea.
The dimpling I picked up from an article in circle track mag:
Race Engine Airflow - Air Flow Tricks For Better Performance - Circle Track Magazine
and here:
Dci 455 Pontiac Engine Combustion Chamber Photo 10
The dimpling I picked up from an article in circle track mag:
Race Engine Airflow - Air Flow Tricks For Better Performance - Circle Track Magazine
and here:
Dci 455 Pontiac Engine Combustion Chamber Photo 10

 10-02-2013, 09:06 AM
#7
Launching!
Thread Starter
Join Date: Jun 2008
Location: Arizona
Posts: 286
Likes: 0
Received 0 Likes
on
0 Posts
I don't see anyone who has an A/B dyno comparison of the dimples. I just know it was a "trade secret", and since I'm not the first to let the cat out of the bag I don't mind posting pics.
Once the engine is back in, I'll mount my O2 bung in the header collector and dial in that mighty demon with a wideband.
I'm going for efficiency, not only for power reasons but for fuel consumption too.
Once the engine is back in, I'll mount my O2 bung in the header collector and dial in that mighty demon with a wideband.
I'm going for efficiency, not only for power reasons but for fuel consumption too.
Trending Topics
10-02-2013, 07:00 PM
#8

Hey Mykk. Its been a while since I've seen any mods to your truck. I talked to you a lot when I did the 383 sbc swap in my 03 truck. Was a while ago but thanks again for the help.
I'm interested to see how the dimple mod does. Seems like a cool idea
I'm interested to see how the dimple mod does. Seems like a cool idea


