new gauge look
 04-07-2010, 11:03 PM
#1
so i finally let my frustration at the amber crap in my instrument cluster get the best of me.
a couple weeks ago, i finally cleared my needles

but that just wasn't good enough. for one, there was still amber 'extreme ranges' on the gauges & the needles (although just fine at night) were a little difficult to see in the day. i thought about repainting them white while i had them off, but i decided not to.
today, i had a new idea... make the orange gauge limits red & paint white tips on the needles.
so far, i like it.
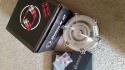
here's the difference in color

here's the red on the aux gauges

and a close-up of the finished needles

the shots of the finished gauges lit up didn't turn out at all, so that's all ya get.
i'm swapping the 194 backlights to purples in a few days whenever my bulbs & twistlocks get here. should be really nice when it's all said & done.
a couple weeks ago, i finally cleared my needles
but that just wasn't good enough. for one, there was still amber 'extreme ranges' on the gauges & the needles (although just fine at night) were a little difficult to see in the day. i thought about repainting them white while i had them off, but i decided not to.
today, i had a new idea... make the orange gauge limits red & paint white tips on the needles.
so far, i like it.
here's the difference in color
here's the red on the aux gauges
and a close-up of the finished needles
the shots of the finished gauges lit up didn't turn out at all, so that's all ya get.
i'm swapping the 194 backlights to purples in a few days whenever my bulbs & twistlocks get here. should be really nice when it's all said & done.


 04-09-2010, 10:58 AM
#6
thanks 
i just pulled them off, dipped a Q-tip in fingernail polish remover, then scrubbed away. the next day, i found a can of OOPS in the closet
not black light; purple... and the bulbs ain't in yet - should get them in the mail today.
by the way, they're incandescent - i couldn't find any decent-quality LEDs with the right beam spread, so i just went with the same ones i use in my blinkers
04-11-2010, 09:19 PM
#7
so the white tips weren't really doing it for me during the day. they just blended in with the numbers. that said, i went with the idea that popped in my head after i'd already got one of the white tips done - red tips.
got them done this evening & so far they're looking better.
i also got my purple bulbs in yesterday morning & it's takin a little bit to get used to, but i like it - definitely like nothing i've ever seen anywhere.
speaking of that... those of y'all who are using the T10 twistlocks from superbrightleds.com - are y'all's not vertical when twisted fully in? when i twist them all the way in til they lock, the base/handle is about 30* off vertical (about the angle of this bar -> / ). that also twists the contacts off the metal so they won't light up unless i untwist them a bit. that would be fine if the plastic back plate didn't have the vertical cutouts for the sockets. if i twist them far enough to be vertical, they fall out & if i twist them far enough to be really secure, the plate won't snap back on. i've almost found a happy medium, but one socket is a real problem. to get it lined up enough to snap the cover, it's too loose to make contact. any suggestions?
Trending Topics
05-14-2011, 10:36 PM
#8
so a year later, i'll update this a little...
back in the fall, i was working with our laser etcher in the shop & got to thinking... we use this to friggin burn into stainless steel - surely i can cut some plastic. so i took my backing plate off the gauges & cut the twistlock holes into circles. fits right over them now at whatever position they happen to be turned in
and, as expected, those incandescent purple bulbs burned through their color in a matter of weeks :/ i just left them in there anyway with a orangish-purpley color going on. then, this week, i finally got my new bulbs in... i found some great purple LEDs last fall & have had 1 pair (as a test) that's been in all sorta different places to see where all it'd work as well as the build quality, etc. i finally bought enough for all the bulbs i wanted to convert over & got them installed in the gauges & ash tray this weekend (as well as a bunch in the car). holy crap, they're so much more amazing now!! these gauges look so much better than i imagine when i first came up with this concept. as you can tell, i'm pleased with the outcome! the purple's a nice rich color & the red show up even better now.