
Painting the black plastic stuff...
 04-21-2011, 01:14 AM
#11
TECH Regular
 04-21-2011, 11:03 PM
#12

use th prompter first then put three good wet coats wait bout 5-10 min flash time the sand with 320 repeat til texture gone then water sand it with a 600 grit them hammer the clear if ur doing clear...put ont good wet slick coat of clear n sand it with a 1500 n reclear it .....make sure ur fan it about 8-10'' away from the part for sexy slick finish
I agree w/. this post Billy, sounds like how I'd do it for the most part. You want a little surface scuff on substrate that a proper grit provides but no so fine like someone previously said (not 1500 IMO) for paint to adhere.
Plastic parts are kinda funny, unlike metal cause they get this static thing goin where the fibers stand on end; if you've done it before, u know what I mean. Therefore I prefer to wetsand em. A tack coat 1st before u douse heavier coats. Multiple thin coats are better than heavy thick coats, esp. w/. say a metallic base. Clear is a different animal as it flows out so to speak. I can do easier than I can explain.

Do 2 things above all.
1)Prep - that is the key to everything in life. Here too.
2)Use an adhesion promoter on this. Otherwise, I wouldn't do the job.
Terry, duct tape & a hammer, huh?!?

Why not just press those lil pins back in by applyin hand pressure?
When dry.
04-22-2011, 01:47 PM
#13

I'm planning on doing this same thing to my grille, door handles, and mirror caps this summer.
My buddy who's probably going to help out (and shoot a bit himself) when I shoot your truck works at a body shop, maybe the 3 of us can have a sanding party.
I think you might have met him at the ETown swap meet last spring?
My buddy who's probably going to help out (and shoot a bit himself) when I shoot your truck works at a body shop, maybe the 3 of us can have a sanding party.
I think you might have met him at the ETown swap meet last spring?
Sanding party sounds...fun?
 Although, sanding with others isn't as bad as sanding alone...beer helps me sand better
Originally Posted by 06murder
use th prompter first then put three good wet coast wait bout 5-10 min flash time the sand with 320 repeat til texture gone then water sand it with a 600 grit them hammer the clear if ur doing clear...put ont good wet slick coat of clear n sand it with a 1500 n reclear it .....make sure ur fan it about 8-10'' away from the part for sexy slick finish
Originally Posted by fastnblu
I agree w/. this post Billy, sounds like how I'd do it for the most part. You want a little surface scuff on substrate that a proper grit provides but no so fine like someone previously said (not 1500 IMO) for paint to adhere.
Plastic parts are kinda funny, unlike metal cause they get this static thing goin where the fibers stand on end; if you've done it before, u know what I mean. Therefore I prefer to wetsand em. A tack coat 1st before u douse heavier coats. Multiple thin coats are better than heavy thick coats, esp. w/. say a metallic base. Clear is a different animal as it flows out so to speak. I can do easier than I can explain.
Plastic parts are kinda funny, unlike metal cause they get this static thing goin where the fibers stand on end; if you've done it before, u know what I mean. Therefore I prefer to wetsand em. A tack coat 1st before u douse heavier coats. Multiple thin coats are better than heavy thick coats, esp. w/. say a metallic base. Clear is a different animal as it flows out so to speak. I can do easier than I can explain.
I know that plastic is tricky, and no, I've never done it before. I've seen enough refinished bumpers with the paint chipping off and looking like
 that I know that I don't want mine to look like that.
I agree 1000% that PREP IS THE KEY!
 I learned that a long time ago when my step father worked a second job at a body shop.
04-22-2011, 04:57 PM
I learned that a long time ago when my step father worked a second job at a body shop.
04-22-2011, 04:57 PM
#14
TECH Resident
iTrader: (3)

Join Date: Dec 2007
Location: The Land of OZ...
Posts: 958
Likes: 0
Received 0 Likes
on
0 Posts
I met one of your friends at the swap meet last spring, same guy?
Sanding party sounds...fun? Although, sanding with others isn't as bad as sanding alone...beer helps me sand better
Sounds good guys...should I use clear?
I know that plastic is tricky, and no, I've never done it before. I've seen enough refinished bumpers with the paint chipping off and looking like that I know that I don't want mine to look like that.
I agree 1000% that PREP IS THE KEY! I learned that a long time ago when my step father worked a second job at a body shop.
Sanding party sounds...fun?
Although, sanding with others isn't as bad as sanding alone...beer helps me sand better Sounds good guys...should I use clear?
I know that plastic is tricky, and no, I've never done it before. I've seen enough refinished bumpers with the paint chipping off and looking like
that I know that I don't want mine to look like that.I agree 1000% that PREP IS THE KEY!
I learned that a long time ago when my step father worked a second job at a body shop.....on my rear pads, only time will tell if the paint does chip off??
Last edited by MADS99; 04-28-2011 at 11:55 AM.
04-22-2011, 05:46 PM
#15
Baltimore Whore
iTrader: (95)

Join Date: Apr 2004
Location: In a van DOWN BY THE RIVER
Posts: 16,820
Likes: 0
Received 2 Likes
on
2 Posts
Yes use clear for sure.. Only issues i see with plastic chipping is the areas that flex alot, when you do not use a paint with the flex additive in there... Other wise PREP PREP PREP.. You can manipulate the paint in the end, if the finish is shitty, but whats under it you can not.. NOW QUIT ALL THE TYPING AND GET TO IT.. 

 04-23-2011, 09:03 PM
#19
TECH Fanatic

i paint cars n plastic **** everyday....if u want it to pop then use 1000-1500 then reclear.. trust me it will pop if done right..fyi it u want make it go a bit faster you can 240 theres not much differce to 320...
04-24-2011, 12:25 PM
#20
TECH Fanatic
Join Date: Mar 2009
Location: St. Louis Area
Posts: 1,513
Likes: 0
Received 0 Likes
on
0 Posts
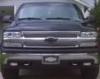
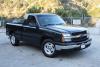
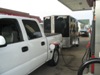
Here is my contribution. Everything I have matched on my truck I did myself and I am NOT a pro by any means. lol
https://www.performancetrucks.net/fo...d.php?t=460462
https://www.performancetrucks.net/fo...d.php?t=460462